Revisiting the Alexander Technique
The Alexander Technique helps you take care
of yourself during a challenging day at the office.
Brownie Siegler, RDH
I recently read with delight two articles in RDH - "Painful Inspirations" in the November 1999 issue and "Alexander the Great" in the April 2000 issue. Both articles referred to the benefits of the Alexander Technique. I, too, am a hygienist who has been helped (saved!) by the Alexander Technique. I was first introduced to the technique in 1994 and have since enrolled and graduated from a three-year teacher-training program. I still maintain a part-time position as a hygienist, alternating my days between hygiene and teaching the Alexander Technique. The Alexander Technique has proved invaluable to me in almost all aspects of my life, but especially in my occupation as a hygienist.
I would like to discuss some of what has been helpful to me and to other dental professionals with whom I work. I thought it might be both instructive and fun for you to come into my operatory and listen to some of the dialogue that goes on while I practice hygiene and the Alexander Technique.
As I check the list of patients, I notice that my first one is Mrs. Jones. I have had Mrs. Jones as a patient for the last 10 years. She is a sweet, kind woman in her late fifties who suffers from multiple physical ailments, most of which are tension-related. She is not an easy patient. The appointments begin well enough, but, around 30 minutes into a prophy, she starts to gag uncontrollably, asking, "Are we almost finished?" She hardly ever lets me finish polishing.
Before I learned the Alexander Technique, I would get pulled right into her tension. While I would appear calm on the outside, internally I was a mess. Not so any more! I take a few moments before bringing her in and do a kind of "inner video" to see if I can sense any tension inside myself. I can do this because my Alexander studies have taught me about my "kinesthetic sense." Kinesthetic literally means the appreciation of movement. In this case, I am referring to the inner movement that is going on in my body. The kinesthetic sense acts as a monitor to my inner tension. It sends up a "red flag," accurately telling me where my tension resides. To release this tension, I have to use my mind. The Alexander Technique is mind/body oriented.
At the heart of the technique is the importance of the dynamic relationship of the head, neck, and torso. When tension exists in the neck, the whole body is compromised. Pain in the wrist or shoulder, for example, may originate at the head and neck. Tension results when the head, which can weigh between 10 to 20 pounds, presses back and down on the spine, compressing it.
Through the guiding hands of a teacher, Alexander students learn to refine their kinesthetic senses, determining when the neck is free from tension. Only when the neck is "free" can the spine lengthen and widen, activating the body`s anti-gravity reflex. This innate reflexive response, what Alexander teachers call "primary control," is what allows the head and thus the whole body to come into balance. Our greatest challenge is not to interfere with this mechanism, but that is where we all get into trouble!
F.M. Alexander, the founder of the technique, discovered our greatest temptation to interfere comes at the moment between a stimulus and its response. Pausing at that moment, saying "no" to the habit of tensing the neck, and replacing that habit with the mental directions to free the neck, activates the primary control. He called this pausing "inhibition," and it is the axis around which the Alexander Technique revolves.
As my tension dissipates, I can feel everything shift. I am breathing again, more focused, and ready for Mrs. Jones! In she comes, tighter than a top. While I ask her how she is and update her medical history, I continue to stay with myself. By the time I sit, I am ready for the challenge. Instead of "telescoping" to see into Mrs. Jones`s mouth, I use my mental directions and activate my primary control. This ensures that I look into her mouth easily from the all-important head/neck joint. I check to see if I am gripping, bracing, or grabbing anywhere. If so, I know that my neck is tensing. I want release, not tension-draping elbows, released knees and thighs, free and easy joints so I can move with ease.
I also do some "body mapping." Body mapping is how you observe yourself from the inside out. It is your concept of your body`s anatomy. When your body map is accurate, you are able to move more efficiently. Mapping is never done instead of, but at the same time as the Alexander Technique.
I sense my weight being evenly distributed through my "sit-bones" to the chair. The sit-bones are the two bones that are at the base of the pelvis. They function like rockers on a rocking chair. They allow me to roll backward and forward while still maintaining the integrity of the head and neck. This is quite different from moving forward or backward by rotating the pelvis. When the pelvis is rotated forward, the lower back becomes rounded, the shoulders and chest collapse, and the head protrudes. When the pelvis is rotated backward, the back overarches, the chest is raised, and the shoulder blades are drawn together. If the pelvis is balanced, however, the sit-bones point straight down, delivering my weight into the chair. This way, if I want to see into the back of Mrs. Jones`s mouth, all I have to do is "fold" at my hips or my center by rolling on my sit-bones. This allows my whole body to move together with ease.
We are about 15 minutes into the cleaning when I feel the first tug of Mrs. Jones`s muscular lip. It clues me that she is tiring. I enlist her help by asking her to "soften" her lip. I tell her that each time she feels her lip pushing against my mirror to let it go. I have to keep repeating my instructions, but eventually a gentle tap is all it takes for her to soften. At the same time, by using the Alexander Technique, I take care of myself and am able to easily scale the 4 mm pocket between #23 and #24.
While we are working, we are almost always retracting a cheek/lip with one hand and using the fine motor skills of our trade with the other. Accurate mapping of the arm structure is critical for free arm movement.
The shoulders attach to the ribs at only one point, where the ligaments connect the collarbone to the top of the sternum. Thus, the shoulders are free-moving, hanging from muscles attached from the head and neck. When shoulders are drawn back as in a "sit up straight" posture, the shoulder blades move close together, the back is overarched, and the chest is pushed out, creating enormous tension throughout the body. If the shoulders are forward or rounded, the shoulder blades are pulled apart and stick out somewhat like wings. The back tends to bulge between them and the collarbone depressing the chest pushes the sternum down. This is the classic "slump" position. If instead we allow the shoulders to float out sideways or horizontally from the sternoclavicular joint, they can hang easily and allow the whole body to be more open and balanced. When the shoulders hang balanced, the shoulder blades settle down flat against the ribs and the arms are supported by the strength of the back. This way, when I feel the tug of Mrs. Jones`s lip I can meet the resistance of her antagonistic force with balance. I have the strength of my back behind me so I don`t have to yank on her lip or cause injury to myself. I am grounded but free-moving.
This freeing of the collarbone greatly affects the way we use our arms and hands. There are two bones in our forearm. When the hand turns so that the knuckles are horizontal, these bones are crossed. If, however, we turn our hand by rotating the wrist with the "little finger side" leading, the knuckles become vertical and the two bones almost parallel. This relationship between the two bones permits the hand to be more sensitive and responsive, while scaling as it allows the hand to be supported by the back. This is commonly referred to as a neutral wrist. It is what allows us to cradle our instruments using our elbows, hands, and wrists freely without unnecessary tension. Understanding this is key in the prevention of tendonitis and carpal tunnel syndrome.
Mrs. Jones is doing great, and I finish polishing and flossing. We are comparing notes on raising our daughters - hers out of the nest, mine still mercurial teenagers. As she leaves, she turns back. I can tell there is something more she wants to say. "You know, it really wasn`t all that difficult today." I smile at her and think to myself, "No it wasn`t. Thank you, Alexander Technique!"
There is another thank you that I would like to extend. In the opening of this article, I mentioned that I was first introduced to the Alexander Technique in 1994. This was through another article written by Carol Coady. I would like to personally thank Carol for the influence she has had on my life. It is generous hygienists like her who give credence and integrity to our profession.
It is my hope that this article, too, might act as a "springboard" for those of you suffering from occupational neuromuscular trauma. If you are a hygienist in pain and interested in learning what it is you may be doing to cause yourself injury, then the Alexander Technique might be for you.
To find a qualified Alexander Technique teacher near you, two professional organizations can be contacted: Alexander Technique International (ATI) at www.ati-net.com, or call the main office at (888) 668-8996, and North American Society of Teachers of the Alexander Technique (NASTAT) at (800) 473-0620. NASTAT also has a free book catalogue available.
Brownie Siegler, RDH, RMT, graduated from Ohio State University College of Dental Hygiene in 1968 and has been a clinical dental hygienist since that time. In 1998, she returned to Ohio State to present a lecture demonstration on the Alexander Technique to second- and third-year hygiene students. She is a graduate of The Alexander Foundation, a registered movement therapist, and a certified teaching member of Alexander Technique International, a professional organization of Alexander Technique teachers. The illustrations for this article were adapted from Back Trouble by Deborah Caplan, Centered Riding by Sally Swift, and The Art of Changing by Glen Park. She will be presenting a minuteman lecture on the Alexander Technique at the 2001 Yankee Dental Congress in Boston. Siegler can be contacted by e-mailing her at [email protected].

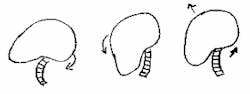
Primary Control
Left: Head pushes back and down toward shoulders, resulting in a "slump."
Center: Head pulls forward and down toward chin, resulting in too much tension.
Right: Head is poised, allowing neck to be "free" and without tension.

The Sit-Bones
Left: Pelvis is rotated forward, forcing the "sit-bones" forward, as well as rounded shoulders and back, resulting in a classic "slump" position.
Center: Pelvis is rotated backward, forcing sit-bones to lift off chair, as well as an overarched back and shoulders, resulting in a "sit up straight position."
Right: Pelvis is balanced, and the sit-bones point straight down. Back and arms are supported; spine is lengthened and widened.
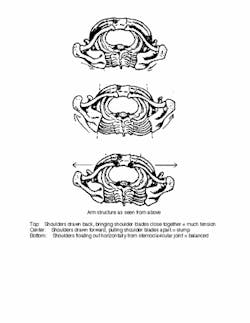
Aerial view of shoulders
Top: Shoulders are drawn back, bringing shoulder blades close together and resulting in too much tension.
Center: Shoulders are drawn forward, pulling shoulder blades apart and causing the body to slump.
Bottom: Shoulders float out horizontally from the sternoclavicular joint for a poised position.
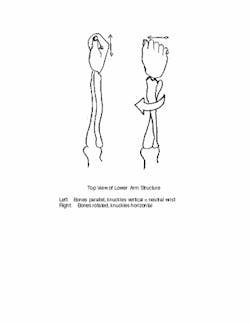
The neutral wrist
Left: The bones in the lower arm are parallel, and the knuckles are vertical, resulting in a neutral wrist.
Right: The bones are rotated, and the knuckles are horizontal, "twisting" the wrist.
Constructive Rest
Constructive rest is a procedure that many Alexander Technique teachers recommend to their students. It is done while lying down on the floor with books supporting your head, knees bent pointing toward the ceiling, and hands resting on the torso. Merely being in this position for 20 minutes enables your spine to lengthen and widen on its own. Since the floor is suporting your weight, it is easier to feel the subtle release of muscle tension than while standing or sitting.
Constructive rest is also a wonderful way to practice using your mind and body together.
I try to do constructive rest daily. Almost all Alexander Technique books include a chapter on constructive rest. Two such books, which I have found helpful, are "The Art of Changing" by Glen Park and "Principles of the Alexander Technique" by Jeremy Chance.
- Brownie Siegler, RDH