by A. Milton Bell, DDS
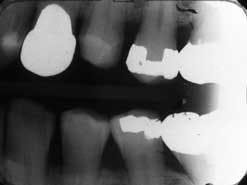
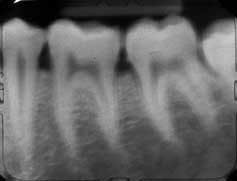
Radiographs, or X-rays, are an integral part of dental practice. When radiographs are not of diagnostic quality, it can result in a number of serious consequences. Radiographs that fail to disclose existing diseases or pathology are a disservice to the patient. In addition, should a patient bring legal action against a dental practitioner who is not in possession of diagnostic quality X-rays, the dentist may face negative legal consequences.
What constitutes proper standards of care in regard to dental radiographs?
Part of this answer involves an understanding of the imaging area. When 32 teeth are present, some practitioners consider 19 X-rays to be a "full-mouth X-ray series." However, this is not necessarily sufficient. The number of X-rays taken should be dictated by at least two factors:
• What teeth are present?
• Do the radiographs taken permit a complete diagnosis of all areas being surveyed?
For example, dental students often take an incomplete series on new patients because "the patient does not have any teeth in that area." However, even if teeth are missing in a segment of either jaw, the patient may have a pathological condition or retained roots. If the affected portions of the jaw are not imaged, the diagnosis and treatment plan will be incomplete, and the practice may be subject to future legal liability.
If a patient is edentulous or missing many teeth, periapical X-rays of the remaining teeth must be supplemented by X-rays of the edentulous areas, or a panorama type X-ray can complete the radiographic examination. If the practitioner does not have a panoramic type X-ray machine, he or she must take periapical X-rays of all areas of both jaws (a full-mouth series of X-rays) to meet legal standards of care.
Simply taking the right number of X-rays, however, does not fulfill the legal obligation of the dental practitioner. The radiographs must also achieve sufficient standards of quality.
Image quality
To fulfill a practice's legal and quality-of-care standards, diagnostic quality X-rays must be kept with the records of the patient's chart and maintained for the time period set by the Board of Dentistry in the jurisdiction where the practice is located. X-rays that are poorly fixed and washed may fade or become unreadable after a period of time. Should the practitioner be summoned before a Board of Dentistry to answer a complaint by a patient, he or she will have to show the Board all patient records, diagnostic quality X-rays and models. Lacking any of these items, the dentist will be found liable for any patient complaints, and possibly subject to legal sanctions and/or punishments by the Board of Dentistry.
To accomplish this, the practitioner must have procedural standards in place to ensure that every radiograph taken will be of diagnostic quality. The practitioner should be familiar with the settings of the X-ray machine's kilovolts and milliamperes in accordance with manufacturer's recommendations. Some late models are self-adjusting to electrical line current fluctuations. Some machines have to be adjusted to their correct setting for recording the X-ray. It's important to periodically review the basic functions of the X-ray machine.
Pay attention to the film chemistry as well. Make sure that the developer and fixer solutions are viable, and adequate washing of the final X-rays is available according to the producer of the film type you are using (usually 10 minutes in running water). There are different types of films that permit you to record a good radiograph with a minimum of X-ray radiation exposure to the patient. Switch to a rectangular tube (Rinn Co.) and use an F-type film (Kodak InSight™ intraoral dental film) to reduce the exposure by 60 percent.
We often take a lot for granted. However, it is prudent to standardize equipment being used as well as the processing set-up for proper handling of the exposed films. When you set up your own office or are employed to practice in a dental office, you may be legally responsible for X-rays you take. Furthermore, as a dental licensee, it is your responsibility to familiarize yourself with the X-ray environment in which you work. You must ascertain what is going to happen that will ensure a successful recording of the teeth you are exposing to X-ray radiation (photons). Boards of Dentistry and OSHA mandate proper coverage of the patient with a lead apron fitted with a thyroid collar.
It's also important to note that re-taking X-rays exposes patients to unnecessary radiation.
The clinician has to be far enough away from the radiation beams or behind a lead screen with a window for viewing the patient as the exposure button is depressed. The X-ray machine is fitted with a tube that is a collimator (round or rectangular), which causes the radiation to be directed in a small column towards the film so as to reduce the stray radiation and to minimize the area being exposed. The exposures are now measured by fractions of a second set on the X-ray machine called pulses, rather than timed in seconds (as was formerly done). A full series taken with fast film exposes the patient to less radiation than a single film taken years ago prior to the advent of fast film and technologically improved X-ray machines. This fact should help you answer questions about exposure to radiation often asked by patients.
Casting a shadow
We can use some simple analogies to explain what it is that makes taking X-rays simple and predictable. Taking X-rays is putting a film in the patient's mouth — with or without a holding device and a ring for positioning the head of the X-ray and the face of the tube — and then pressing a button. There are some very simple basic rules that, if followed, will increase your success for recording diagnostic quality X-rays. Cone cutting is easy to avoid if you understand what you are doing.
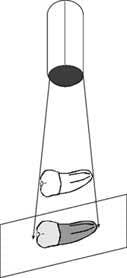
Think of taking an X-ray as being similar to casting a shadow. If you are walking down a dark street towards a streetlight, your shadow will be elongated behind you. As you get closer to the streetlight, your shadow will start to become smaller. At some point, your shadow will become the same dimension as your height. Then, as you approach the streetlight, your shadow will become shorter and shorter until you are under the light, when it will be the smallest in dimension. Then, as you continue to walk past the light, your shadow will appear in front of you and begin to grow larger as you continue away from the light source, until it will appear larger than life.
The same principles explain why clinicians may get X-rays that are foreshortened or elongated. Foreshortening and elongation of the teeth in an X-ray is the result of improperly placing the head of the machine at an incorrect angle, or placing the patient's head so that the arch being radiated is not parallel to the floor. This causes the "shadow" of the tooth to be miscast on the film. The long cone technique helps avoid these problems.
In order to cast the proper image on the film:
• The jaw being X-rayed has to be parallel to the floor.
• The film has to be placed adjacent to the teeth being X-rayed.
• The tube has to be at the correct angle.
• The opening of the tube has to be parallel to the film.
Think of the radiation emanating from the tube as a bullet coming out of a rifle. If the bullet is aimed at the mesial or distal of the tooth, the hole will be made in the direction the bullet enters the tooth. If the bullet is perpendicular to the tooth, the hole will be made through the center of the tooth. If the tube face is parallel to the tooth or teeth, the radiation will flow in a perpendicular pattern through the teeth. This is how you must think in order to prevent overlapping of teeth and distortion that prevents reading the films for decay or other pathology. Ideally, the beams of radiation are focused perpendicular to the angle formed by the tooth (teeth) and the film.
It's also helpful to visualize taking X-rays as if you are framing a picture with a camera. What is it that you wish to record? Each film in a series is designated for a particular tooth or segment of teeth. Therefore, you want to get the main subject in the middle of the film, except in very rare special cases when you are looking to locate something (in endodontics, for example).
Placing films
There are basic rules that must be followed to ensure good diagnostic X-rays. Use the chair and adjustable headrest to position the patient so that the arch you will be filming is parallel to the floor.
If you are preparing to expose 19 films, you will note that the top row from right to left starts with a No. 6 cuspid film, then a right lateral and central film Nos. 7 and 8. Then there are central and lateral film Nos. 9 and 10, then a No. 11 cuspid film. Placement of the film for each of these views is of paramount importance. A simple, quick procedure is to train yourself to use the Styrofoam film holders. The upper anteriors are all taken in the long axis of the film. With the arch parallel to the floor, start placing the angle of the machine at 45 degrees and bring it closer to the patient. Then place the film in the Styrofoam holder opposite the No. 6 cuspid so that the tooth is in the middle of the film and the patient is lightly biting on the holder that places the film close to the palate.
Placing a cotton roll in the fold opposite the site being radiographed will give you a better view of the tooth.
Now, bring the head of the X-ray machine so that the opening of the tube is parallel to the face of the cuspid and aim the tube like a gun so that the radiation will pass perpendicular to the face of the tooth and cast the shadow on the film behind. Tell the patient to hold still while you go behind your protective screen or safely away from the X-ray beams, and press the pulse button.
Repeat the process for each of the next three films. If all the basic rules have been followed, you will record the teeth designated for each film with a full view of the clinical crown, full view of the root and surrounding bone and tissue, and no interproximal overlapping.
In a 16 X-ray series, you would include the lateral with the cuspid, and take one view of both central incisors. Avoiding overlapping will result in a good view of the interproximals of all upper anterior teeth.
Posterior segments
Treat the posterior segments in a similar mesio-distal manner. The long axis of the film is placed in the Styrofoam holder (white side always toward the teeth) so that the film follows the occlusal plane of the arch. Again, placement of the film is of paramount importance in securing diagnostic quality X-rays. There is no excuse for improper placement of films in the arch by the clinician.
There is also no reason for the patient to gag. There are two gag centers. One is located in the back of the pharynx; obviously the film packet is nowhere near this area. The second "gag center" is in the patient's head ... it's a function of patient anxiety, not a physical trigger. Therefore, perform the task in a positive, reassuring, competent manner to help the patient relax. Before you begin placing the film, explain what you are going to do, and why you need the patient's cooperation. In addition, ask the patient to breathe hard. Breathing forcefully interferes with patient gag reflexes. Working quickly and deftly, place the head of the X-ray machine near the patient's head to expedite the procedure.
In each posterior segment, whether taking a periapical or bitewing of the bicuspids and molar views, the placement of the film is as follows:
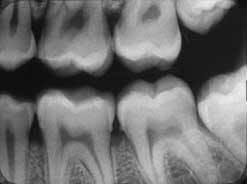
• For the bicuspid view, the film is placed in the arch with the mesial of the film just barely touching the distal of the cuspid, if present. The bicuspid view will incorporate a full view of the first molar region as well. On the upper jaw, the angle of the X-ray head is preset at 30 to 35 degrees and the face of the tube parallel to the bicuspid-first molar region. Once the film is placed as described, aim the face of the tube like a rifle so the beam will be passing through the face of the teeth being X-rayed, without overlapping of the interproximal and avoiding cone cutting. Actually, you should determine that the open face of the tube is parallel to the bicuspid and first molar, and that the entire film is within the parameters of the open tube. With practice, this procedure should not take more than five to 10 seconds.
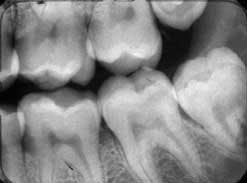
• Properly imaging the molar view in the arch depends on placing the film opposite the third molar area. This is done in a similar way as is used for the bicuspid view, except that the mesial of the film as it is placed in the mouth must be at the middle of the first molar. The patient is biting lightly on the Styrofoam holder. The angle of the X-ray head is set at 20 to 25 degrees in the upper arch. Once again, it's important to develop the ability to bring the face of the tube parallel to the second and third molars and aim the tube to send the beams perpendicular to the film to avoid overlapping. If the film is viewed as being entirely within the face of the tube, you will avoid cone cutting and interproximal distortion. This gives you a clear view of the second and third molar area, the distal half of the first molar and surrounding bone and soft tissue.
The most common errors seen are the overlapping of bicuspids on the cuspid view. This occurs because the film has not been placed with the cuspid in the middle of the film, and the head of the X-ray is turned so that the beam is casting the shadow from the distal through the bicuspids onto the cuspid, or because the beam is casting the shadow from the mesial through the cuspid overlapping on the bicuspids. Remember, you are aiming the beam like a rifle, and the beam is a bullet that must pass through the face of the tooth or teeth you want to X-ray. The open face of the tube must be parallel to the face(s) of the teeth being X-rayed.
Lower arch
When taking X-rays in the lower arch, the arch must be parallel to the floor. It is very difficult to take good X-rays when the patient is in a reclining position. Instead, always seat the patient in an upright position to facilitate positioning of the arch being X-rayed so that it is parallel to the floor.
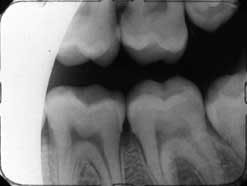
Place the films in the Styrofoam holder and place the films opposite the teeth to be viewed for the bicuspid and molar X-ray. Pre-set the angle of the X-ray head at -10 degrees for the bicuspid view and -5 degrees for the molar view, following the same technique described for the upper arch. Bitewing films are placed in the film bite holders and are placed in a similar manner for the bicuspid view and then the molar view, and the angle of the head is set at 5 to 10 degrees.
Occasionally, during radiographs of the lower arch, the corners of the film feel like they are digging into the sensitive tissues of the floor of the patient's mouth. There are two ways to address this. You can choose a film packet with a cushioned edge such as Kodak SureSoft™ packets. It is also helpful to get the patient to relax because the floor of the mouth will be more flexible and accommodate the film packet more easily.
One of the most common errors is due to improper placement of the films in the arch to be X-rayed. We frequently see X-rays mounted in the posterior regions where the bicuspid and the molar views are identical, or the right lateral and central incisor are missing, and there are two views of the two central incisors. Placement of the film is of paramount importance for the success rate of diagnostic quality films. If you do not place the films in the correct position, the shadow will be cast only on those teeth in front of the misplaced film.
Similarly, if the head of the X-ray machine is facing distally or mesially instead of parallel to the film or average face of the tooth or teeth, the result will be overlapping, cone cutting, and missing parts of the teeth needed for proper diagnoses. The film edge being held by the Styrofoam holder must follow the occlusal plane. If the film is crooked, the result will be an X-ray that is improperly positioned.
Lower anteriors
The lower anteriors follow the same technique of casting a shadow on the film. The four anteriors should be recorded on one film. Place the short end of the film in the Styrofoam holder. Encourage the patient to relax to enable comfortable placement of the film. Gently bring the film opposite the four anteriors as you have the patient gently bite on the holder. This relaxes the muscles in the floor of the mouth and minimizes the discomfort of the film placement.
The X-ray head should have been set at -15 degrees and moved close to the patient's head. The arch should be parallel to the floor when the patient bites on the holder. Aim the tube so that the beam will pass through the lower four incisors perpendicular to the film and the faces of the teeth. Use of the holder ensures recording of the full view of the incisal and apices of the teeth.
The angulations of the X-ray head given here are averages. You should consult the manual of the equipment manufacturer for more exact angulations recommended for the X-ray being used.
The canine view is also taken at -15 degrees. By now, you have gained experience in efficiently bringing the head of the machine near the patient's head, placing the film so that the canine is in the middle of the film, and aiming the tube so that the beam passes through the middle of the tooth. This completes the periapical full-mouth series.
Practice these basic techniques and your ability to take diagnostic quality X-rays will be improved. Just as important, your legal responsibility to the patient will be enhanced so that you will have the protection of proper records to show in the event you are the subject of a patient complaint.
For additional sources of information on obtaining good, diagnostic quality X-rays, visit the Kodak Dental Products Web site at www.kodak.com/go/dental and click on "Publications," or call (800) 933-8031.
A. Milton Bell, DDS, is a clinical professor at the NYU College of Dentistry's department of prosthodontics and occlusal studies, as well as an international continuing education instructor. He served as Quality Assurance Monitor under the jurisdiction of the New Jersey Attorney General's Office, Department of Law and Public Safety. He is a member of the American Association of Dental Examiners and is an examiner for the Northeast Regional Board of Dental Examiners.
