What are your favorite instruments?

by Nancy J. Miller, RDH, BA
Like the song from the Sound of Music says: “Raindrops on roses and whiskers on kittens / bright copper kettles and warm woolen mittens / brown paper packages tied up in strings / these are a few of my favorite things.” Everyone has their favorite things, and this is especially true for dental hygiene instruments.
When I staff an instrument company’s booth at trade shows, it is amazing to see the passion some hygienists have when declaring their loyalty to a certain instrument and defending its uniqueness and efficacy. Just asking them to look at something new is sometimes akin to asking them to forsake their firstborn child!
Through school exposure and use, then experience and experimentation, hygienists discover their favorite instruments — the ones they can’t do without. Sometimes this is of their own choosing, and sometimes it’s because the practice where they work has hygienists sharing instruments or using those that are already in place. This is understandable, but there is a plethora of hand and power instruments on the market, along with different manufacturers. It sometimes behooves us to step away from our favorite instruments and try something new, see if maybe they will become our favorites for the task at hand.
I teach courses in ultrasonic scaling and have for 20 years. I have my favorite ultrasonic tips and hand instruments, and I would like to share them and my philosophy of the instrumentation sequence with you. These are not my favorites from dental hygiene school (OK, those of you who know me know that was way too long ago!), but they are instruments that now allow me to practice ergonomically and efficiently. I subscribe to the “less is better” philosophy, and “KISS” (keep it simple, stupid).
Most articles about ultrasonic instrumentation tend to focus on their approved use for periodontal applications.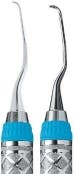
I learned how to use ultrasonic instrumentation while working in a periodontal practice. Of course, all of my patients were perio patients, and most of the research and articles were on periodontal applications. When I left the perio practice for a general practice, I was so used to using ultrasonics on every patient that I just continued to do so, including so-called easy patients, children, people with braces, older citizens, etc. I used ultrasonics on everyone, and I discovered I did not need to use as much hand instrumentation.
The ergonomics of ultrasonics
In my other role as a clinical coach for Jameson Management, as well as through teaching hands-on courses through my own company, ultraconcepts, I discovered many students were not using ultrasonics on all patients. They felt that, if the patient was “easy,” there was no need to pick it up. Or their technique involved using the power scaler for about four minutes throughout the whole mouth, then returning to redo the whole mouth with hand instruments. In reality, I had discovered that ultrasonics are even better for easy patients than some of my perio patients.
Part of my mission with my colleagues is to encourage them to use ultrasonics more routinely on “easy”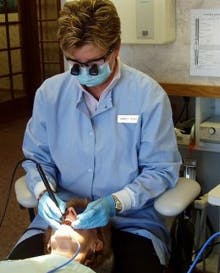
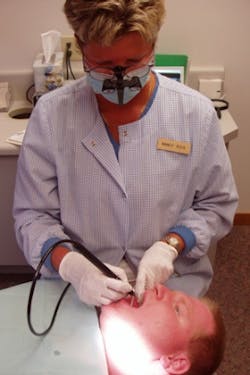
12 o’clock positioning allowed me to use direct vision, keep my shoulders straight and arms close into my body, and with my wrists in a neutral position (see Figure 2). The addition of loupes decreased the angle of my neck, but required I get the patient down very low to the floor and at knee level. Positioning of the chair in the treatment room can often be altered to allow you room to maneuver behind the patient and between cabinets and equipment. A lot of chairs have bases that can be moved or repositioned.
I analyzed what I was doing in terms of the sequence of the appointment and discovered that I was naturally limiting the amount of movement I was doing and was keeping my upper body in a neutral position. I felt relaxed and comfortable and began to assess what I was doing in terms that I could share with colleagues.
I began to formulate what I called my sequence and started teaching it to hygienists. It involved completing one quadrant or sextant to completion, then moving on to the next. Since we don’t have to set an edge or use a fulcrum in power scaling as we need to in hand scaling, I didn’t have to move as much. I tended to stay in one area of the mouth until I felt it was complete. The universality of most tips allowed me to move the tip around the entire tooth with the same tip while staying in one position.
I first completed all of my assessments and data collection for all of the information I needed to proceed. I already was polishing the patient at the start of instrumentation instead of at the end to remove any loose debris and plaque so as not to put it into the aerosol. Also, I remembered the author of a letter appearing in RDH magazine who said polishing first was like “sweeping before mopping.” The analogy made sense to me, and I thought of another analogy for completing one quadrant completely before moving to the next: It is like doing dishes by hand. You don’t wash half of a plate and put it in the rack along with other half-washed plates before returning to the first plate to finish washing the other half. Why not do a section of the mouth to completion? My finger memory and actual memory are fresh and able to keep track of one section at a time. To return to an area seemed like wasted time and motion. The only exception to this rule is the lower anterior teeth: I first do them to the best of my ability from the 12 o’clock, then when I move to 9 o’clock position to complete the upper right quadrant, I retrun to the lower anterior teeth. Experience shows us that you always get a different view of those teeth from both 9 and 12 o’clock (see Figure 3).
The instruments I use are not set in stone as I have others bagged and ready to go, especially for root planing. In general, my kit consists of a double-sided mirror (great for vision and illumination while retracting), a caries detection explorer (of the doctor’s choice) and a periodontal probe on one handle, an EXPAF 11/12 calculus detection explorer, a Langer 3-4 universal curette, a Nebraska 128 single-ended scaler, a posterior sickle scaler such as a Hu-Friedy NEVI3 or PDT Montana Jack, and either a piezo or magneto universal thin ultrasonic tip. I prefer wider handles (size 8), and I like a resin handle on my probe, 11/12 explorer, and the Nebraska 128. I feel this lightens up the instrument and increases my tactile sensitivity (see Figure 4).
My appointment sequence for a routine adult six-month visit goes like this (appropriate chitchat, patient concerns conversation, explanation of what will be done today):
1. Health history update, education on medications, health-mouth correlation
2. Pre-rinse for 30 seconds (with whatever mouthrinse you like)
3. Necessary radiographs
4. Recline, extraoral assessment for TMJ, oral cancer screening, soft tissue, document
5. Hard tissue assessment, document
6. Periodontal assessment, document
7. Calculus assessment with the 11/12, especially interproximally
8. Discussion of needs (if extensive, sit patient up and do it knee to knee/eye to eye), intraoral camera, alert doctor for exam
9. Recline, polish entire mouth
10. Begin ultrasonic instrumentation

I have been using this sequence for the last 20 years with what I feel is great success. My patients rarely have to do more than tilt their head in the direction of the saliva ejector I place in the corner of their mouth to enhance removal of the water (see Figure 5).
I prefer the Hygoformic “curly” (Orsing/Pulpdent) variety as the coil prevents the tissue from getting sucked in and they stay in position well without me or the patient having to hold it.
So what are your favorite things? Can you think of what you have in your current kits and streamline them?
My hope is that you have learned something from my technique and are now able to assess and view your own sequence with new eyes and ideology. And that you will pick up your ultrasonic scaler more often! RDH
Nancy J. Miller, RDH, BA, has been a consultant with Jameson Management, Inc., since 1998. Her area of expertise is in clinical procedures and periodontal therapy and instrumentation. Miller holds a bachelor of arts degree in communications and management from Concordia University in Wisconsin. She received her associate’s degree in dental hygiene from Ferris State University in Michigan, and is an adjunct faculty/clinical instructor at Northeast Wisconsin Technical College. She is also past president of the Wisconsin Dental Hygienists’ Association. She is a clinical technical advisor on products for Hu-Friedy Manufacturing.
RDH event get connected.RDH Event, the virtual online dental hygiene conference, returns on March 15-16.
The virtual conference, which renders hotel and flight reservations as unnecessary, features all of the benefits of attending a large dental conference from any comfort level that you can arrange with your computer. Free continuing education seminars are offered, and the exhibit hall requires no hiking — just a click to talk live with a manufacturer about a dental hygiene product.
The conference encourages networking with dental hygiene peers via a “lounge,” and many prizes and samples are given away during the two-day conference.
To sign up for the free registration to RDH Event, visit RDHEvent.com.
Past RDH Issues