Instrument management systems

Mary Govoni, CDA, RDA, RDH, MBA
The ultimate safety and efficiency toolMary Govoni, CDA, RDA, RDH, MBA
The use of instrument cassettes has changed the face of instrument management in many dental practices and other dental facilities. The benefits of using cassettes, also known as instrument management systems, are numerous. The three key benefits are organization, efficiency, and enhanced safety for dental team members.
Before we look at the organization and efficiency gained by using cassettes, let’s look at the safety factor. The OSHA Bloodborne Pathogens Standard1 states that sharp, contaminated instruments must be transported from a work area to a cleaning/sterilization area in a closed, puncture-resistant container. This helps prevent sharps injuries to health-care workers who handle and transport the instruments. Although the instruments in dental practices are typically not transported long distances, the hazard exists nonetheless.
In educational settings or large clinics, the instrument processing area may be located quite a distance from the treatment areas, which increases the hazards of handling and transporting loose instruments with contaminated, sharp ends. A study published in the Journal of the American Dental Association (JADA) several years ago indicated that punctures from contaminated instruments was one of the most common injuries classified as an exposure incident2 in dental facilities.3 The proper use of instrument cassettes eliminates this potential hazard and assures that the facility is in compliance with OSHA standards and the Centers for Disease Control and Prevention (CDC) guidelines.4
In addition to enhanced safety, instrument cassettes assist dental teams in keeping instruments organized, particularly by procedure. The cassettes are typically divided into two categories in general practices — hygiene setups and restorative setups. These can be subdivided into types of hygiene procedures — pediatric, prophylaxis, perio/root planing — and types of operative procedures — amalgam, composite, crown/bridge, etc.
Setting up the system should begin with making a list of the most commonly used instruments and items for each procedure. The next step is determining the size and configuration of the cassette based on the number and type of instruments to be placed in the cassette.
There are several efficiencies that can be realized by using instrument cassettes. One is the reduced setup and cleanup time required for procedures. When setting up, team members simply need to select the appropriate procedure cassette from storage. Time saving is achieved when only one cassette, rather than several packages of instruments, needs to be retrieved to prepare the treatment room. All of the required instruments for a specific procedure are located inside the cassette, while some additional disposable items may need to be added during the treatment room setup. One option for increased organization and efficiency is to organize the disposable items for each procedure type into matching colored procedure tubs (see Figure 1).

During treatment, the cassette can be opened and used as the delivery system to keep the instruments organized. In addition, color-coded and variably positioned instrument rings can be placed on the instruments to indicate the sequence in which the instruments are to be used. This makes it simple to place instruments back in their designated spots after use. It is faster and easier to retrieve the instruments when they are organized rather than placed loosely on a tray or work surface.
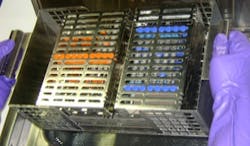
When the procedure is completed and the instruments are secured in the cassette, it can be closed and locked and safely transported to the reprocessing area. Once there, the entire cassette can be placed into the ultrasonic cleaner or instrument washer (see Figure 2). Because the instruments do not need to be handled individually either before or after cleaning, this allows for faster instrument processing. In addition, cassettes help extend the lifetime of the instruments as the working ends are protected during cleaning versus being loose in an ultrasonic basket, where the tips often get stuck.
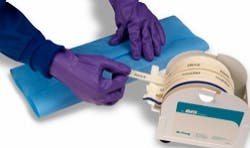
Once the instruments are cleaned, rinsed, and dried in the cassette, the cassette needs to be wrapped or placed into a sterilization pouch. The cassette is then placed into the sterilizer, and once the drying cycle is complete, the cassettes can be placed in the designated storage area.
A common misconception regarding cassettes is that they don’t need to be packaged for sterilization. The CDC guidelines recommend that all instruments be packaged prior to sterilization unless they will be used immediately after removal from the sterilizer.5 There are pouches sized for various types of cassettes, as well as sterilization wraps for this purpose. The CDC guidelines also recommend placing a chemical indicator on the inside of each package. If the internal indicator is not visible from the outside, an exterior chemical indicator should also be placed on the package.6
The indicator strip typically has a pass or fail indicator to help the user determine if the instruments in the cassette have been exposed to sterilization. If the indicator strip shows a “fail” when the cassette is opened, a new strip should be placed in the cassette and it should be rewrapped with new wrap and reprocessed. When wrapping cassettes, a special autoclave tape should be used to secure the wrap. This tape also serves as an external indicator and is available in blank, colored, or with preprinted procedure names to assist in identifying the type of instruments in the cassette (see Figure 3). If pouches are used, it is very easy to identify the cassettes as the rails holding the instruments can be color-coded according to the procedure type. Most pouches have indicators built into the packaging material. Look for indicators that are underneath the “plastic” layer of the pouch.
It is important to note that implementing an instrument management system may require more than just planning the procedures and corresponding instrument setups. Since some older sterilizers may not accommodate many or any large cassettes, a larger capacity sterilizer may be required (10” or larger). The same may be true for older ultrasonic cleaners (minimum three gallons).
There is a wide variety of sizes and types of cassettes available. Stainless steel cassettes tend to be more durable and less prone to breakage or warping, as the cassettes are repeatedly cycled through the sterilizer. Specialty systems, such as oral surgery and orthodontic cassettes, are available to accommodate the different types of instruments used in these specialties. In addition, many cassettes have special clips and adaptors for items such as scissors or hemostats to keep the hinges open during sterilization, or needle recapping devices that can be placed inside the cassette for use during procedures.
No matter what type of practice, cassettes are an essential safety and organizational tool. If your practice or facility is not currently using an instrument management system, make it a priority to research the efficiencies that can be gained and implement one soon. RDH
Mary Govoni, CDA, RDA, RDH, MBA, is the owner of Clinical Dynamics, a consulting company based in Michigan. She is a member of the Organization for Safety, Asepsis and Prevention. She can be contacted at [email protected].
References
1. Occupational Safety and Health Administration, CFR 29, Standard 1910.1030, (d)(4)(ii)(E) and 1910.1030, (e)(2)(ii)(B).
2. Occupational Safety and Health Administration, CFR 29, Standard 1910.1030, (a).
3. Journal of the American Dental Association, Vol. 128, Issue 9, 1253-1261.
4. “Guidelines for Infection Control in Dental Health-Care Settings 2003”, http://www.cdc.gov/mmwr/PDF/rr/rr5217.pdf
5. Centers for Disease Control and Prevention (CDC), Guidelines for Infection Control in Dental Health-Care Settings, 2003.
6. “Guidelines for Infection Control in Dental Health-Care Settings 2003”, http://www.cdc.gov/mmwr/PDF/rr/rr5217.pdf.
Past RDH Issues