Are you ready to perform?
BY Susan S. Wingrove, RDH, BS

Dental implants now have a survival rate of over 95% for single-tooth replacement after five years, with an estimated more than 48 million implants to be in function over five years by 2015.1-3 Dental professionals need to be ready to take on this important challenge. Learn what the evidence-based protocol is to assess and monitor the health of the implant. Know which instruments are safe to debride implants and why. Gain a true understanding on what is critical to know after the implant is in function. Are you ready to perform?
Evidence-based implant therapy starts by reviewing the patient's medical history, assessing the implant, providing safe debridement, polishing, and daily recommendations for home care.
The five-step assessment consists of:
• A visual examination of the soft tissues surrounding the implant
• Probing and/or palpating the implant for signs of peri-implant disease
• Identify if calculus and/or residue are present
• Evaluate for mobility or pain
• A radiographic protocol to evaluate the bone level4


Figures 3a-b: Threads clearly in focus and CBCT (courtesy of Jeff Carlson, CDT, and Dr. R. Horowitz).
A controversial component of this assessment is "to probe or not to probe" the dental implant. Current research shows that probing the implant is safe with complete regeneration of junctional epithelium and establishment of a new epithelial attachment around osseointegrated implants without fear of harming the perimucosal seal (Figure 2).5-6
According to Dr. J. A. Gerber, probing pressure around an implant should not exceed 0.15 Newtons (0.15N).7 Follow the "simple six" rule that takes into consideration the osseointegration and regenerative procedures to wait six months after the implant has been restored before probing. Probing the implant is used to evaluate for inflammation or infection. Gently probe (0.15N) and note in the patient's record if any bleeding or exudate is present.4
Palpating the implant should be done at every implant maintenance visit to monitor for any signs of infection on single crowns, bridges, or any implants with access to the ridge. Place a finger on the buccal and lingual surfaces of the ridge just below the implant. Keep pressure on each side of the ridge, and move upward toward the implant restoration. If the implant is infected, blood or exudate will ooze up from the sulcus surrounding the implant.4
--------------------------------------------------
Other articles by Wingrove
- New age of periodontal therapy: A.C.E your exam in regeneration dentistry
- Focus on implant home care: Before, during, and after restoration
--------------------------------------------------
It is also necessary to check for mobility and pain associated with the implant. Ask the patient if they are experiencing any discomfort, and test for mobility by placing two mirror handles on either side of the implant or the implant restoration. If there is mobility, it could be the implant itself, a loose crown, or a loose or broken screw. A radiograph may be necessary to ascertain the source of the mobility or pain.
Radiographs
The final and most critical step is to take a radiograph to accurately monitor the bone level, biological width invasion, and any bone loss due to trauma or residue left behind on the implant.
Current radiographic guidelines include verification of each stage of the implant treatment - implant placement, prosthesis placement, six months, one year, and once a year thereafter unless a complication is evident. Radiographs are the most important evaluation to identify the health of the implant.
For one to four implants, take a vertical bitewing or periapical film. For five or more implants, take individual periapical radiographs, panoramic film, or a three-dimensional radiograph (cone beam computed tomography-CBCT scan). Line up the diagnostic radiograph of the implant correctly, with all indentations of the implant and the threads clearly in focus4,8 (Figure 3a-b).
A definitive health assessment of the implant needs to include evaluation for peri-implantitis with a combination of data: probing and/or palpating for any signs of infection and radiographic bone loss.9-11
A new peri-implantitis assessment classification by Dr. S. J. Froum and P. S. Rosen specifies that bone loss of less than 25% of the implant length be classified as early implantitis (important to reverse and maintain). Bone loss of 25% to 50% of the implant length is considered moderate implantitis (typically requiring a recommendation for regenerative treatment by a specialist). Bone loss over 50% of implant length is considered advanced implantitis.9,12
Key points to this peri-implantitis classification include bleeding and/or suppuration on two or more aspects of the implant and to take measurements on the radiographs. Ideally, take the measurements from the baseline radiograph, as well as at the time of prosthesis loading and current radiograph. If the baseline not available, the earliest available radiograph following loading should be compared to current radiograph.9
Debridement
After updating the medical history and completing the assessment, begin the implant maintenance by removal of any bacterial biofilm using dental floss (such as dental tape, woven floss, or X-floss by iDontix). Insert the floss below the contacts on both sides of the implant, wrap the floss in a circle, crisscross in front, and move in a shoeshine motion in the peri-implant crevice. Check the floss. If frayed or roughened, and calculus and/or residue is present, instrumentation is necessary to remove the microbial deposits.
Effective implant debridement requires an understanding of the current research supporting safe implant care. Studies confirm "biocompatibility is the key," using like metals for implant scalers to debride implants. Implant surfaces are now rough and porous with surface coatings (hydroxyapatite [HA], titanium plasma spray [TSP], SLActive, and TiUnite) to assist with a more accelerated osseointegration of the implant.13-14

5a. Control

5b. Titanium

5c. Plastic

5d. Graphite


For dental professionals, this means protocols and titanium implant scalers to maintain these rough, porous, and coated implant surfaces for safe and effective peri-implant therapy (Figure 4).
The literature and studies using scanning electron microscopy (SEM) are used to evaluate implant surfaces. Prior to the early 1990s, scratching was the main concern. Studies showed that titanium, graphite, carbon, and plastic implant scalers are all within safe limits to avoid scratching smooth machined implant surfaces.15-17
Table 1 Protocol for Implant Debridement Based on Implant Design • For a narrow base implant, placed where limited horizontal bone is present, select a longer, multi-bent blade implant scaler (such as Ti WinL3-4) and use short horizontal strokes. This is necessary for the hard-to-reach, narrow-based implants under fixed framework prostheses or high-water bridges, and implants that have replaced two teeth with a champagne-glass contoured crown. • For a wide-based implant, often placed in the posterior oral cavity, select a universal posterior scaler (such as Ti Win5/6). Use in an unconventional manner with short, horizontal strokes where the base of the crown meets the abutment or implant. • For exposed implant threads, select a shorter radius blade tip of an implant scaler (such as Ti WinL5 mini), use horizontal side-to-side motion strokes one thread at a time with gentle pressure. • For fixed prostheses, start with an OptraGate retractor (Ivoclar Vivadent) for access, a magnetostrictive or piezoelectric implant-safe sonic insert, or EMS subgingival air polisher (Hu-Friedy) to remove biofilm. If calculus is present, use a long, multi-bent blade implant scaler (such as Ti WinL3-4) with short horizontal strokes to remove microbial debris, followed by lavage to remove debris. |
However, the current studies reveal that implants today with rough and porous surfaces can become contaminated with trace elements of plastic, graphite, carbon, or stainless steel from implant scalers and curettes18-19 (Figures 5a-d).
Dr. Gustavo Avila-Ortiz states: "The use of plastic instruments and tips (ultrasonic) is generally not recommended for implant instrumentation - ineffective in removing calculus and/or cement - in vitro research has revealed plastic particles may adhere to implants when these instruments are employed."13,20-21
Instrument residue such as cement can become lodged on the implant surface, providing a place for bacterial biofilm to accumulate and can alter the biocompatibility of the titanium surface. This can compromise the long-term osseointegration of the implant.1 Biocompatibility is the key. Use titanium on titanium for safe and effective implant debridement (Figure 6).
The other challenge is to select the proper instruments or tools to debride implants based on implant design, access, and prosthesis. Ideally, use a biocompatible implant scaler made of titanium with Rockwell hardness of less than 30, to avoid leaving any trace elements behind and to not scratch the implants. Use short, horizontal strokes to remove any microbial deposits without leaving any residue behind. See Table 1 for protocol for debridement based on implant design.4,22

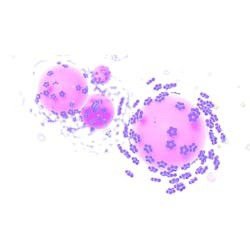
Figure 7: Biofilm/ Inflammation (courtesy of Dr. J. Remien).

Following instrumentation, use a soft rubber cup (not a brush) and a nonabrasive polishing paste (such as Directa Fine/XFine, Ivoclar-Proxyt or Preventech Fine/Nada) to polish implants, including orthodontic TAD implants.
Currently, the only air polisher that is proven safe to use on implants is EMS Air-Flow Perio Powder (glycine, 25 microns) with the Perio Implant Tip - used at the beginning of the implant maintenance appointment to remove the biofilm and prevent cross-contamination. Once the implant is exposed to the environment and restored, a salivary pellicle is formed by bacteria for the formation of biofilm. Therefore, the elimination of 85% of biofilm on a daily basis is critical to the overall health of the implant23-25 (Figure 7).
For added protection, apply an antimicrobial varnish with no fluoride (such as Cervitec Plus, Ivoclar Vivadent) to protect at-risk exposed threads and around the margins of implants (Figure 8).
For added protection, apply an antimicrobial varnish with no fluoride (such as Cervitec Plus, Ivoclar Vivadent) to protect at-risk exposed threads and around the margins of implants (Figure 8).
Home Care
Motivate and educate your patient on key home-care components. The tissue surrounding the implant needs to be stimulated daily. It is the hygienist's role to educate the patient on how to obtain keratinized tissue to maintain a healthy perimucosal seal. The patient should remove the biofilm daily and have an understanding of the products that are safe or harmful to use long term for the implant(s) to be successful.
The tissue surrounding the implant should look pink, firm, and keratinized with no signs of infection. The absence of keratinized tissue has been documented to be more susceptible to pathogenic bacteria, thus leaving the implant vulnerable to peri-implant disease.26
To achieve the keratinized tissue, particularly on implants that retain over-dentures, instruct patients to use a rubber-tip stimulator (multiple manufacturers) or Soft-Picks (Sunstar Americas) daily.
To remove the biofilm effectively from implants, the patient must floss daily or use a water irrigator (such as Waterpik Water Flosser). The Waterpik Water Flosser with the standard tip with three-bristle filaments (Plaque Seeker Tip) used at medium pressure around implants was 81% more effective in bleeding reduction compared to 33% using floss and, most importantly, is proven safe to use for implant home care.27-29
Finally, the key home-care products that can be used long term for implants should not irritate the perimucosal seal,30 or corrode and/or etch the titanium.31-32 High fluoride concentrate of > 3.0 sodium fluoride combined with a low pH will remove the oxide layer on implants and can make the titanium surface corrosive. Once this layer is removed, the implant is prone to corrosion. Stannous fluoride can cause etching and roughness on implants and esthetic restorations.
The antibacterial, antiviral, and antifungal properties in an antimicrobial mouth rinse are ideal for implant home care to prevent bacteria from attacking the epithelial barrier or invading the connective tissue. It is my recommendation to use a chlorine dioxide mouth rinse that kills 99.9% of bacteria in the oral cavity with eight hours of protection, used twice daily (such as CloSYS, Rowpar; OraCare, Dentist Select). It is a non-alcohol rinse without the side effects associated with other antimicrobial mouth rinses for ongoing long-term home care of implants.33-35
Research has shown that chlorine dioxide mouth rinse used postsurgically does not interfere with osteoblastic and fibroblastic activity that initiates healing. Therefore, it is safe to use until healing is complete and, most importantly, can be used long term. The gold standard for implant home care is water irrigation in conjunction with a diluted, non-antimicrobial rinse. This has proven to be extremely helpful for hard-to-reach emergence profiles and fixed and removable prostheses to remove biofilm and prevent inflammation, if used on a daily basis.
After osseointegration has been confirmed and the implant(s) are ready to rock 'n' roll, the patient is largely responsible for the success of an implant. Strive to educate your patients on the importance of good home care, have a go-to set of proper titanium implant scalers for safe and effective implant maintenance, and arrange routine in-office implant maintenance visits to ensure implant success. RDH
Susan S. Wingrove, RDH, BS, is an international speaker on implant maintenance, periodontal therapy, A.C.E. exam, and regeneration. She is the designer of the Wingrove Titanium Implant Set, ACE probes, and Queen of Hearts dental instruments (PDT Inc.). She is a published author on advanced instrumentation, regeneration, and implant dentistry for national and international dental journals, as well as for the textbook, "Peri-Implant Therapy for the Dental Hygienist: Clinical Guide to Maintenance and Disease Complications" (Wiley-Blackwell).
References
1. Ibrektsson T, Buser D, Sennerby L. On crestal/marginal bone loss around dental implants. Int J Oral Maxillofac Implants. 2012; 27:736-738.
2. Jung RE, Zembic A, Pjetursson BE, Zwahlen M, Thoma DS. Systematic review of the survival rate and the incidence of biological, technical, and aesthetic complications of single crowns on implants reported in longitudinal studies with a mean follow-up of 5 years. Clin Oral Implants Res. 2012; 23(Suppl): 2-21.
3. MRG Reports for Europe and NA 2006, 2007, 2009, 2010, 2011. 2012.
4. Wingrove S. Peri-Implant Therapy for the Dental Hygienist: Clinical Guide to Maintenance and Disease Complications. Wiley-Blackwell 8:2013.
5. Lindhe J, Meyle J, Group D of European Workshop on Periodontology. Peri-implant diseases; Consensus report of the Sixth European Workshop on Periodontology. J Clin Periodontol 2008; 35(Suppl 8): 282-5.
6. Etter TH, Hakanson I, Lang NP, Trejo PM, Caffesse RG. Healing after standardized clinical probing of the peri-implant soft tissue seal: a histomorphometric study in dogs. Clin Oral Imp Res 2002: 13; 571-580.
7. Gerber JA, Tan WC, Balmer TE, Salvi GE, Lang NP. Bleeding on probing and pocket probing depth in relation to probing pressure and mucosal health around oral implants. Clin Oral Impl Res. 2009: 20; 75-78.
8. White SC, Pharoah M. J Oral radiology: principles and interpretation. 6th Ed: St. Louis: Elsevier; 2009: 14,152-153.
9. Froum SJ, Rosen PS. A proposed classification for peri-implantitis. Int J Periodontics Restorative Dent 2012; 32:533-540.
10. Mombellli A, Muhle T, Bragger U, et al. Comparison of periodontal and peri-implant probing by depth-force pattern analysis. Clin Oral Implant Res. 1997; 8:448-454.
11. Froum SJ. My patient's implant is bleeding; what do I do? Surg Restor 2011:7.
12. Wingrove S. New age for periodontal therapy, A.C.E. Your Exam in Regeneration Dentistry. RDH Magazine 11:2014: 83-86, 97-98.
13. Avila-Ortiz G. The dental hygienist plays an important role in the prevention, detection, and clinical management of peri-implant diseases. Dimensions of Dental Hygiene. 2013; Vol 11 (5) 57-64.
14. Ramaglia L, Di Lauro AE, Morgese F, Squilace A. Profilometric and standard error of the mean analysis of rough implant surfaces treated with different instrumentations. Implant Dent. 2006; 15:77-82.
15. Carlsson L, Rostlund T, Albrektsson B, et al. Removal torques for polished and rough titanium implants. Int J Oral Maxillofac Implants. 1988; 3(1): 21-24.
16. Ivanoff CJ, Hallgren C, Widmark G, et al. Histologic evaluation of the bone integration of TiO (2) blasted and turned titanium micro implants in humans. Clin Oral Implants Res. 2001; 12(2): 128-134.
17. Klauber C, Lenz LJ, Henry PJ. Oxide thickness and surface contamination of six endosseous dental implants determined by electron spectroscopy for chemical analysis: a preliminary report. International Journal of Oral and Maxillofacial Implants 1990; 5: 264-271.
18. Fox SC, Moriarty JD, Kusy RP. The effects of scaling a titanium implant surface with metal and plastic instruments: an in vitro study. Journal of Periodontology 1990; 61:485-490.
19. Dmytryk JJ, Fox SC, Moriarty JD. The effects of scaling titanium implant surfaces with metal and plastic instruments on cell attachment. J Periodontal 1990; 61: 491-496.
20. Mann M, Parmar D, Walmsley AD, Lea SC. Effect of plastic-covered ultrasonic scalers on titanium implant surfaces. Clin Oral Implants Res. 2012:23: 76-82.
21. Ruhling A, Kocher T, Kneusch J, Plagmann HC. Treatment of subgingival implant surfaces with Teflon-coated sonic and ultrasonic scaler tips and various implant curettes. Clin Oral Implants Res. 1994: 5; 19-29.
22. Meschenmoser A, et al. Effects of various hygiene procedures on the surface characteristics of titanium abutments. Journal of Periodontology 1996; 67: 229-235.
23. Subramani K, Jung RE, Molenberg A, Hammerle CH. Biofilm on dental implants: a review of the literature. Int J of Oral Maxillo Implants 2009; 24:616-626.
24. Quirynen M, Vogels R, Peeters W, Van Steenberghe D, Naert I, Haffajee A. Dynamics of initial subgingival colonization of 'pristine' peri-implant pockets. Clin Oral Implants Res. 2006; 17:25-37.
25. Salcetti JM, Moriarty JD, Cooper LF, et al. The clinical, microbial, and host response characteristics of the failing implant. Int J Oral Maxillofac Implants. 1997; 12: 32-42.
26. Greenstein G, Cavallaro J. The clinical significance of keratinized gingiva around dental implants. Compend Contin Edu Dent. 2011; 32:24-31.
27. Magnuson B, et al. Water Flosser vs. Floss: Comparing reduction in bleeding around implants. J Dent Res 92(Spec Iss A): #3761, 2013.
28. Goyal CR, Lyle DM, Qaqish JG, Schuller R. Evaluation of the plaque removal efficacy of a water flosser compared to string floss in adults after a single use. J Clin Dent. 2013; 24(2):37-42.
29. Gorur A, Lyle DM, Schaudinn C, Costerton JW. Biofilm removal with a dental water jet. Compend Contin Educ Dent. 2009; 30(spec no 1): 1-6.
30. Yukna R. Optimizing clinical success with implants: maintenance and care. Compend Contin Educ Dent. 1993; 15:S554-S561.
31. Nakagawa M, et al. Effect of fluoride concentration and pH on corrosion behavior of titanium for dental use. J Dent Res 1999:78(9): 1568-1572.
32. Matono Y, et al. Corrosion behavior of pure titanium and titanium alloys in various concentrations of Acidulated Phosphate Fluoride (APF) solutions. Dent Mater J. 2006 Mar; 25 (1): 104-112.
33. Sellers K, DiGangi P. Matching rinses to individuals: A review of the evidence. RDH Magazine. 2014.
34. Drake D, et al. An in vitro comparative study determining bactericidal activity of stabilized chlorine dioxide and other oral rinses. 2011.
35. Wirthlin R, et al. Effects of stabilized chlorine dioxide and chlorhexidine mouth rinses in in-vitro cells involved in periodontal healing. 2006.