The role of hygienists in recognizing and healing supervised neglect related to burnished calculus
by Tami Wanless, RDH, MEd
Supervised neglect, as defined by Mosby’s Dental Dictionary, is a case in which a patient is regularly examined and shows signs of a disease or other medical problems, but is not informed of its presence or progress (Mosby’s Dental Dictionary: Edition 2, 2007).
A diligent clinician would never deliberately leave calculus, let alone burnished calculus. But what if you learned today that you were leaving deposits, contributing to chronic gingival disease? Are you unintentionally practicing supervised neglect? Whether you’re a new graduate or a seasoned professional, there are things you need to know to start making positive changes in your next patient.
What is burnished calculus?
When describing calculus attachment to my patients, I like to use the analogy that the calculus attaches to the tooth like a barnacle attaches to a boat. Barnacles produce cement that is released through the tips of their antennules to attach themselves (Grunbaum, 2010). Calculus attaches by mechanically interlocking to the crystals of the tooth, using the acquired pellicle (Roberts-Harry EA, 2000 ;28). Burnished calculus is a subgingival deposit that has had its outermost layer shaved off - but not fully removed - so that the surface is smooth yet still attached to the tooth surface, contributing to disease (Pattison, 2011). When clinicians do not recognize or remove burnished calculus, they are practicing supervised neglect. One wouldn’t “plane away” a barnacle off a boat, nor should you “shave away” calculus from a tooth; in either scenario, you will leave the source of the irritant.

These areas of burnished deposits will contribute to persistent gingival inflammation and bleeding, in addition to providing a constant food source for more bacteria. This vicious cycle will continue until you completely remove all calculus. We set our patients up for failure when, every six months, we tell them to brush and floss to reduce recurrent bleeding while we leave burnished deposits subgingivally.
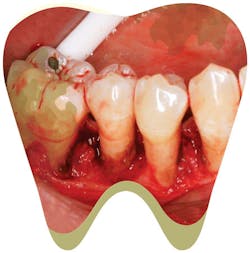
Recognizing burnished calculus can be challenging, even for the skilled clinician. Isolated areas of tissue color change, slight inflammation, or bleeding upon probing in a patient who effectively brushes and flosses regularly may be signs of areas where burnished calculus is present. These areas will not heal until the irritant is removed. Change the way you examine your patient to determine if burnished deposits are present.
Before you pick up a scaler:
- Carefully view the color and consistency of the gingival tissues, paying close attention to interproximal areas and line angles (where the tooth curves and you need to pivot on your fulcrum while rolling your instrument to adapt). Look for red or blue shades as well as swelling. The body’s first line of defense from any foreign object is to send in the white blood cells to cause tissue to become angry red and inflamed.
- Use a generous amount of air and blow toward the cervical tissue at a 45-degree angle. Allow the tissue to distend while you view the sulcus. Many times, I have noticed undetected burnished deposits when I’m using the air polishing unit. Try polishing prior to scaling in an effort to support the newest clinical success while locating burnished calculus at the same time.
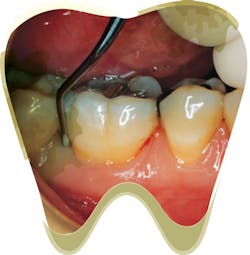
- Pick up your posterior explorer (11/12) and gently search for irregularities. Lighten up your grasp as if you were holding a fragile piece of china. Feel for the slightest elevation. You will not feel a deposit that “clicks”; burnished calculus will be a smooth, raised bump.
It wasn’t me!
Leaving burnished calculus is more common than you may think. Research supports evidence demonstrating that blind root planing is effective only to 4 mm. Beyond 4 mm, 30% to 50% of the subgingival root surface is still covered with undetectable burnished calculus (Carroll, 2015). Burnished calculus is more likely to be found in areas on the root surface with developmental grooves, depressions, furcations, and at the cementoenamel junctions.
Dull instruments are a significant cause of burnished calculus. If a hand instrument is extremely sharp at the onset of removing the calculus and it stays sharp, it will eliminate deposits and not just shave layers away, leaving burnished bumps. When continued scaling with a dull edge occurs, the clinician shaves the deposit and begins to smooth the calculus without removing all of the bacteria.
- Start by using the sharpest instrument available for the maximum success in removing all of the calculus from the start. I am more effective with deposit removal using EverEdge2.0 by Hu-Friedy than any other instrument. I use fewer strokes and lighter lateral pressure on the lower anterior areas specifically, because these new instruments are that strong and sharp. There is less hand fatigue at the end of the day and I don’t need to sharpen nearly as often, because the instruments hold a sharper edge longer. I have never used any other instrument that is comparably sharp.
- Another principle for effective calculus removal is to ensure that the blade-to-tooth angle is correct. If the terminal shank of the instrument is not parallel to the surface being scaled, then the angulation is either too open (greater than 70 degrees) or too closed (less than 70 degrees). To aid in correct angulation, a visual cue is used to ensure the terminal shank of the instrument is parallel to the surface being scaled.
- An incorrect grasp can cause a lack of sufficient lateral pressure to ensure that the sharpened blade grabs onto the calculus. Use a modified pen grasp, ensuring you have enough space between your thumb and index finger to allow for rolling into the line angle areas. Establish secure, solid fulcrums as close to the working area as possible.
Avoid burnished calculus and supervised neglect by using sharp instruments to remove deposits the first time you scale them. Barnacles on a boat cause drag and slow the vessel down. Burnished calculus contributes to chronic disease and overall inadequate systemic health. Be part of your patients’ total body health solution and not the cause of chronic disease as they navigate through life’s waters! RDH
Tami Wanless, RDH, MEd, has 27 years of experience in the dental field with 24 of those years in both the clinical and educational arenas. In her current role at College of DuPage, Tami is a clinical educator, the didactic instructor for head and neck anatomy and histology, and the didactic and laboratory instructor in the science of dental materials. Tami authored the lab manual for the science of dental materials. She speaks on a multitude of dental hygiene-related topics, predominantly instrument sharpening and public health issues. Additionally, Tami is the founder of Sharp Advantage, a nationwide instrument sharpening business. When not educating, sharpening, scaling, or active in professional organizations, you might find her plotting the next dental mission trip. Tami is committed to organized dentistry and quality patient care.
References
1. Carroll J. (2015, June 01). Exposing one of dentistry’s dirty little secrets. Modern Hygienist.
2. Grunbaum M. (2010, March 22). How do Barnacles attach to Whales? Science Line.
Mosby’s Dental Dictionary: Edition 2. (2007). St. Louis: Elsevier.
3. Pattison A. (2011, August 9). Burnished Calculus at the CEJ. Dimensions of Dental Hygiene, p. 74.
4. Roberts-Harry EA, (2000;28). Subgingival calculus; where are we know? Journal dent, 93-102.
5. Pattison A. Keys to Effective Calculus Removal, Dimensions of Dental Hygiene. October 2011; 9(10): 50-53.
Darby/Walsh; Dental Hygiene theory & Practice; Ed 2; pg. 397