The mysteries in labs
by Sheri B. Doniger, DDS

How often do your patients ask, "Why does a crown take so long?" or "Why does this crown cost so much?" They don't ask because the dentist didn't explain the procedure, or the business coordinator didn't explain the time and money. They ask because they truly don't understand all the intricate procedures — from the time the impression leaves the office, to the completion steps in the lab.
Some offices have their own labs, allowing patients to tour the facilities. The offices that perform their own lab procedures sometimes offer patients "show and tell" for those who want to see their cases in progress. For the rest of the offices, lab procedures are a bit of a mystery. While we have all taken a dental materials course, many of the nuances of laboratory techniques were omitted.
All team members should tour their local lab. Since we are all in dentistry, each team member should know the important components of treatment and be able to explain their purposes to the patient. This makes it easier for team members to discuss the investment of a prosthesis.
Here I will discuss five procedures that are not completed directly in the patient's oral cavity. Many of these procedures have multiple steps, and patients return for interim visits. This list in no way includes all of the services performed in a dental lab.
Several dental procedures are sent to laboratories. Composite inlays and onlays, porcelain inlays, onlays or crowns, porcelain fused-to-metal crowns or implants, and removable partial and complete prosthesis with or without retainers are among the many products fabricated in the dental lab. The initial steps are the same for many, but the final processing may be different. For the extremely busy lab, there may be a one-day delay between steps. Rush cases are accommodated to the best of a lab staff's ability. An outstanding relationship with the lab should be a top priority in any excellent dental practice, as this will affect both the process and the finished product.
All lab work begins with a good impression taken at the dental office. When sent to the lab, the impression is poured in the appropriate stone. Some labs pour all of their stone at a certain time of the day. Depending on the due dates for the final restoration, the time the case arrived "in house," and how busy the lab is, the case may have to wait another day for processing.
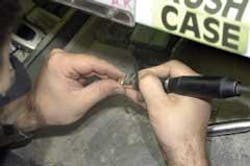
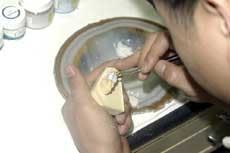
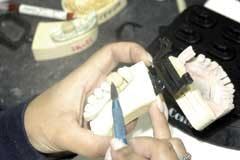
The second day of the lab procedure involves model-work. The prosthetic appliance is fabricated upon a form. For individual units, such as composites or porcelain teeth, dies must be strategically cut, and the margins of the prep must be highlighted or trimmed so the technician is able to wax to the appropriate "end point." The models are articulated into occlusion to allow the finished product to be taken through the masticatory functional and parafunctional movements. Undercuts, which will impede the finished inlay, onlays or crowns to be properly seated on the tooth must be blocked out and the dies must be painted to simulate the thin layer of cement used in the dental office. For removable partial prosthesis, model trimming and articulation need to be performed. (Complete removable prosthesis will be discussed later because the steps are different.) Many labs perform all model steps on the same day to prepare the dies for waxing.
Wax-ups of the teeth are made on the third day. Depending on the type of metallic restoration required, wax patterns are formed for individual or bridge units. These patterns, which recreate the tooth shape, are made for either tooth or implant-borne restorations. If a tooth is a full metal crown, the pattern remains intact as the tooth was waxed. For porcelain fused-to-metal restoration, the wax is prepared to allow space for porcelain to be fused on at a later stage. A removable partial appliance's wax pattern is made where the framework will be located. All clasps, tooth-bearing areas, and palatal or lingual bar coverage are included in this pattern. The wax patterns are set on sprues and placed into metal investment rings. The patterns are then embedded into an investment material. After the investment material hardens, the rings are placed in a burn out oven, where temperatures range from 1200 degrees F for a gold casting to 1450 degrees F for a porcelain metal casting. This takes from two to four hours to overnight, depending on the materials used.
The next step involves casting. Different techniques and casting torches are implemented depending on the metal. Air is used for gold metal and oxygen is used for porcelain. Most castings are made in a machine that forces the molten metal into the area of the "lost wax" from the wax pattern that was inside the investment prior to furnace treatment. The casting systems involve a centrifuge, which forces the molten metal into the void created by the lost wax. Timing is a key step in this process. Casting should be accomplished within seconds of removing the casting ring from the burn out furnace. If it is not, the cooling will not allow for the metal to flow into the ring properly. Also, any expansion will cause the final restoration to not fit either the die or tooth accurately. A solid porcelain or a laminate tooth is formed with the lost wax technique. The ceramic material comes in cube form and is cast directly in to the investment mold, where it will appear transparent. The material has to be processed, or "cereammed," at 8000 degrees C to 12000 degrees C, which allows the crystalline component to be precipitated. Additional colors are added later.
For a porcelain restoration, the next step involves placement of intricate layers of opaque, then porcelain. After the metal is cleaned and prepared, a layer of opaque is placed on the tooth, which blocks out the dark metal. Porcelain is added to the tooth into the desired shape and shade. A visit to the ovens under pressure at 1700o F allows the porcelain components of feldspar and quartz to fuse. Subsequent layers of porcelain are added along with different tints until the finished tooth replicates the natural dentition.
Final steps include finishing and polishing the metal and glazing the porcelain. The teeth are adjusted into the occlusion, as presented in the bite impression sent with the original prosthetic impression. This entire process takes eight to nine days in the laboratory, fewer days in a local lab.
Fused composite restorations, such as inlays, onlays or laminates, are prepared similar to gold work. The gel-like material comes in tubes and is sculptured, similar to porcelain. The composite is hardened under nitrogen for 10 to 15 minutes. This process adds strength and glaze to the finished product. The intaglio must be etched and silanated to allow for mechanical retention in the cementation process. Similar products formed completely of porcelain also require this internal treatment.
Removable appliances are not created equal. Complete removable appliances may be on tissue, copings, or implant bound. Initial preparation for this procedure includes a wax bite to ascertain the occlusal distance and bite relationships.
Double models are prepared. Wax rims are created and molded to the duplicate model, which will replicate the interocclusal distance and arch contour of the patient. The laboratory will order teeth specific to the dentist's requirements of size, shape, color, and material. When the teeth arrive, they are set in wax on the mounted rims. The wax-up is returned to the dental office for patient try in.
After returning to the lab, the appliance is prepared for its final stages. The wax denture and the stone cast are placed inside the metal denture flask and submerged in plaster. The flask is closed and placed in a boil out chamber to melt the wax. The two halves of the flask are separated, leaving the teeth embedded into the plaster. Acrylic resin dough is inserted into the flasks and these are closed together. The acrylic is processed for eight hours to activate the heat curing resin. If the final prosthesis is to be seated on implants or copings, the metal must be set into the wax pattern in a precise position. After the process is complete, the flask is opened, the halves are separated and the acrylic is finished and polished.
When a removable appliance is sent to the lab, duplicate models are also fabricated. One is used for the wax up and destroyed during processing, and the second is used in the final phases. The removable partial appliance is cast utilizing the duplicate model. The metal framework is replaced on the original model after finishing and polishing. Teeth are set in wax and returned to the dental office for an interim try in visit to evaluate the fit, occlusion, and esthetics.
The chain of communication concerning dental procedures begins with the hygienist and is confirmed with diagnosis from the dentist. Because hygienists are integral components of patient care, we need to understand the basics of laboratory procedures to promote excellent communication with our team members and patients.
If you have a lab in the neighborhood, plan a visit for the entire team. The lab technicians will be as excited to show you their procedures as you will be to discuss their dental creations and investments with your patients.
Author's Note: The author wishes to thank Jacob Bletnitsky of Jacob Ceramics in Skokie, Ill., for his invaluable assistance and infinite patience with me through the years.
Sheri B. Doniger, DDS, practices in Lincolnwood, Ill. She graduated from the University of Illinois College of Dentistry in 1983 and obtained her bachelor's degree in dental hygiene from Loyola University of Chicago in 1976. She can be reached at (847) 677-1101 or [email protected].