Infection control has always been a hot topic, but it seems that the current COVID-19 pandemic has really shined the spotlight on what we were and weren’t doing … and now, what we have to start doing. I don’t know about you, but I’m not sure I’ve ever been in a dental office that is doing everything right 100% of the time. Each office finds a way into its own unique routine in that quest to practice standard precautions. What works for one practice—the systems, procedures, protocols, and especially products the team can agree on—varies from office to office.
In light of the COVID-19 pandemic, room turnover is one topic that has us all looking for guidance. There are questions about lingering aerosols and what kills this novel virus. How can we limit our own exposure, as well as that of our patients?
The Centers for Disease Control and Prevention (CDC) has recently walked back its recommendation that treatment rooms be allowed to sit for 15 minutes before disinfection begins for patients without suspected COVID-19.
“To clean and disinfect the dental operatory after a patient without suspected or confirmed COVID-19, wait 15 minutes after completion of clinical care and exit of each patient to begin to clean and disinfect room surfaces. This time will allow for droplets to sufficiently fall from the air after a dental procedure, and then be disinfected properly.”1
How do we even know what recommendations to follow? It feels like a full-time job keeping up with the changes! Personally, the 15 minutes was a rather exciting opportunity to squeeze in that elusive bathroom break and gulp of water we so desperately need with all of the personal protective equipment (PPE). But how many offices were really adding this time into an already stressed and backlogged schedule? And was it really protecting us and our patients? There is so much that we do not understand about this novel virus, while we strive to keep up to date, so we need to double down on what we do know.
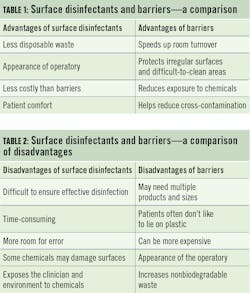
Now is the time to check the instructions for use (IFU) on your chosen surface disinfectant. Some products require a two-step process; others are one-step procedures. The kill time varies per product from one-to-10 minutes, meaning the surface must stay wet for that long to be properly disinfected. So, if you are still using a product with a 10-minute kill time, you need a solid 15 minutes for the room to be cleaned and the product to have time to do its job.
I will never forget, early in my hygiene career, how seeing Bob’s name in the schedule caused me to break out into a cold sweat. He was one of those difficult patients. Bob would have an overly dramatic reaction to having to lie on a plastic bag. When I’d perform my morning chart review, I’d see that note in his chart: “Do not use plastic barriers.” Hopefully, when his traditional 2:00 p.m. appointment arrived, I’d remember not to place the bag on the chair or on his required neck pillow, lest I experience the wrath of Bob.
I’m curious, with the new awareness of infection control, if patients will change their feelings about certain procedures (cough, cough—I’m looking at you, patient safety glasses). But that’s a whole different article.
There are many barrier options. Barriers for clinical contact surfaces can include clear plastic wrap, bags, sheets, tubing, and plastic-backed paper or other materials impervious to moisture.3 There are no specific regulations regarding which products to use. You can order from your favorite supplier or buy plastic wrap at the grocery store. Barriers must be removed and discarded between patients while wearing the proper PPE. After removing the barrier, inspect the area to ensure that it did not become soiled. Then, perform hand hygiene and place new barriers before the next patient is seated.
There is one procedure where barriers are not optional. Semicritical devices are exposed to mucous membranes, but they cannot be heat-sterilized; they must be covered. Consider your x-ray sensor, intraoral camera, lasers, and any devices that go in the mouth but that are sensitive to heat. This is in a different league than keyboards and air-water syringes. These barriers must be FDA-cleared to reduce contamination, so the grocery store sandwich bag will not cut it this time. Crack open your product catalog or log into your supply account and find your approved barriers there.
Curiously, numerous studies show that barriers do not always protect devices from contamination. In 2003, the CDC reported a 44% failure rate for digital x-ray sensor barriers.3 In 2015, Choi4 examined barrier protection from multiple standpoints. This study compared the efficacy of barriers with four different thicknesses and using double-barrier techniques.
It began by testing barriers ranging from 0.04–0.08 mm in thickness. What the study found is that the two thinnest barriers failed 47%–58% of the time, which was even higher than the CDC’s finding in 2003. The 0.06 thickness failed 35% of the time, and the 0.08 failed 22% of the time. But with added thickness came patient discomfort. The 0.06 barrier bothered some sensitive patients, while the 0.08 caused sharp pain in many patients. So, thicker is not always better.
Choi next looked at using two barriers—both with a 0.04 thickness—and found the failure rate decreased to 25% with no patient discomfort. Then, he tried using the 0.04 as the inner barrier and a latex finger cot as the outer barrier. Not only was this technique difficult, it also resulted in a 32% failure rate.
Through six different modified techniques, it was concluded that the use of double barriers of 0.04 mm thickness can reduce the perforation rate by more than half, but the risk of contamination could not be eliminated. Until we have access to a product that does not have a high failure rate, applying a double-barrier technique in conjunction with cleaning and disinfecting the device with an EPA-registered hospital disinfectant after each patient is recommended.
Dentistry is no stranger to change. Just ask a hygienist who’s been around for more than 20 years. Things certainly aren’t being done “the way we used to.” That’s why we have continuing education, magazines, and conferences—to keep learning from one another and bring cutting-edge science back to our practices. As we continue to improve our infection control practices in light of our new knowledge, we need to constantly look for ways to be more efficient and more effective while we evaluate new protocols.
The most important things are that each team member agrees to the established protocols and knows the how and why behind the routine. This will ensure that those new protocols are done correctly and consistently every time.
References
- Guidance for dental settings: Interim infection prevention and control guidance for dental settings during the COVID-19 response. Centers for Disease Control and Prevention. National Center for Immunization and Respiratory Diseases (NCIRD), Division of Viral Diseases. Updated June 17, 2020. Accessed June 10, 2020. https://www.cdc.gov/coronavirus/2019-ncov/hcp/dental-settings.html
- Schneiderman MT, Cartee DL. Surface disinfection. In: DePaola L, Grant L, eds. Infection Control in the Dental Office. Springer, Cham; 2019;169‐191. doi:10.1007/978-3-030-30085-2_12
- Kohn WG, Collins AS, Cleveland JL, et al. Guidelines for infection control in dental health-care settings—2003. MMWR Recomm Rep. 2003;52(RR-17):1-61.
- Choi JW. Perforation rate of intraoral barriers for direct digital radiography. Dentomaxillofac Radiol. 2015;44(3):20140245. doi:10.1259/dmfr.20140245
Amanda Hill, BSDH, RDH, has been in dentistry for more than 25 years. She currently practices part-time clinically and is an industry educator for dentalpost.net. Recently she began sharing her passions by writing for dental companies and magazines. Hill is a member of the advisory board for RDH magazine and is hosting her very own podcast on the Dental Podcast Network. She is a proud RDH, Navy spouse, and mom of three, and is intent on spreading kindness wherever she goes.
About the Author

Amanda Hill, BSDH, RDH, CDIPC
Amanda Hill, BSDH, RDH, CDIPC, is an enthusiastic speaker, innovative consultant, and award-winning author who brings more than 25 years of clinical dental hygiene and education to dentistry. Recipient of ADS’s Emerging Infection Control Leader award and an active participant with the advisory board for RDH magazine, DentistryIQ, and ADS’s Infection Control in Practice Editorial Review Board and membership committee, Amanda (also known as the Waterline Warrior) strives to make topics in dentistry accurate, accessible, and fun. She can be reached at [email protected].

