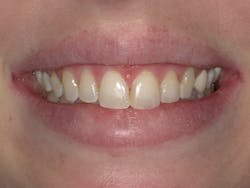
White spots be gone: A minimally invasive approach with long-term results
As a primary caregiver in the dental practice, the role of the dental hygienist extends far past being a periodontal therapist. Most hygienists are well versed in not only the common procedures that their employers perform, but also have intimate knowledge of newer diagnostic and minimally invasive treatment options that can benefit their patients and practices.
Hygienists are quite often the first caregivers to interact with patients and address their concerns. For patients of all ages, a frequent complaint is about white spots. These can arise due to a lack of mineralized enamel from the time of tooth eruption. They can also be caused by enamel breaking down due to improper oral hygiene. As a primary caregiver, hygienists can initiate conversations about white spots and educate patients about potential treatment options.
Over the years, a variety of solutions have been tried to reduce or eliminate white spots. Most of these solutions involve some form of esthetic adhesive dentistry, and this has proven the test of time. However, the main disadvantage of this approach is the removal of healthy tooth structure.
The concept of a minimally invasive approach that would work and be long-lasting has been tried by many with varied success. But what if a predictable minimally invasive approach with long-term consistent results could be achieved without removing tooth structure? In the remainder of this article, we will look at one such approach and go through a case study. But before we do, let’s consider the patient-hygienist conversation that led to treatment.
Patient conversation
This conversation took place five years ago in our practice, but it could very well have taken place last week:
Patient: I am here for my cleaning today, but I have some cosmetic concerns. I hate my smile and my teeth are stained. I have white spots and a chip on my front tooth. I am getting married in seven weeks. What can we do to fix up my smile so I can look great for my wedding pictures?
Hygienist: I’ll be happy to look, take some clinical photographs, and inform the doctor of your concerns.
Patient: Thanks so much! I trust you, and I know you and the doctor can help me. One last thing. The wedding is expensive, and we are paying the whole bill, so I am on a limited budget.
Hygienist: I’m sure we’ll figure out some options that won’t break the bank!
These types of conversations occur every day in our practices. Patients want to look better, but often their budgets are limited. Sometimes, when they do have the finances, they limit us in other ways, such as when they say, “Please don’t drill down my teeth,” or “I need this done in the next two weeks.” Communication is always key, and an open wallet with no restrictions can make things easier. But what did we do in this case, when the young woman was getting married in seven weeks and wanted her smile restored on a limited budget?
Case study
Let’s look at how we gave our patient her wedding smile.
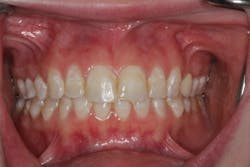
The patient presented with discolored anterior teeth. The teeth had a combination of white spots and brown striations. Tooth No. 9 had an incisal chip (figure 1).
The goal was to make the patient’s smile better for her wedding day, but in a minimally invasive fashion (“don’t drill down my teeth”) and on a limited budget. No small task! She expected us to figure it out and for the results to last over the long term.
Treatment options were presented and included the following:
- Reconstructing with minimal-prep porcelain veneers. Even though I suspected her budget couldn’t handle it, I presented the option.
- Reconstructing with composite veneers. This is no easy task, and once again, her budget likely couldn’t handle it. Also, it was not the best choice because of the risk of chipping and breaking in the future. (Porcelain would be prettier and stronger.)
- Remineralization approach. This would fix her spotting and striations. A remineralizing chemotherapeutic cream would be used with a specific approach, which included teeth whitening followed by an incisal edge composite repair.
The patient chose option three, knowing full well that a seven-week time frame could present challenges. While perfection could not be guaranteed, we expected great improvements and relatively long-term results (about five years).
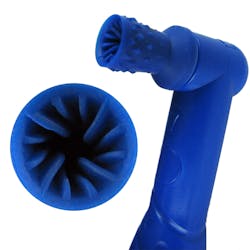
Remin Pro (Voco) was selected as a chemotherapeutic agent. Remin Pro is a cream that releases calcium, phosphate (nanohydroxyapatite), xylitol, and fluoride to assist in remineralization. The patient’s teeth were first cleaned using a Mystic Cup on a Prophy Magic prophy angle (Prophy Magic USA). The Mystic Cup is a nonlatex cup with ridges on the outside that allow for efficient plaque removal in the interproximal areas of the teeth (figure 2).
Our assistant took upper and lower impressions using Silginat (Kettenbach USA), a nonmixing alginate substitute made from polyvinyl siloxane (PVS). Impressions were poured in stone and then made into bleaching trays. (Trays are needed for two phases of the treatment.) Once this was completed, gingival protection was placed via cotton rolls. A liquid rubber dam may also be used.
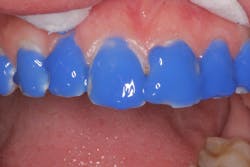
Opalustre (Ultradent Products), a 6.6% hydrochloric acid slurry, was applied to the teeth. It was worked into the affected area gently with the firm cup that comes in the kit (figure 3). The goal of the Opalustre treatment was to remove any soft, flaky, demineralized enamel, and to open the enamel tubules for acceptance of Remin Pro. A short application time was used, no more than 10 seconds per tooth. Pressing too hard on the cup with Opalustre can remove too much enamel and necessitate restorative treatment.
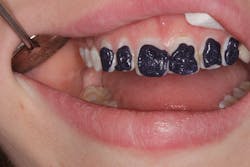
After treating the teeth and rinsing off the slurry, a 37% phosphoric acid etch (Vococid, Voco) was applied to the affected area for 30 seconds and rinsed off, causing further demineralizaton and deeper opening of the tubules (figure 4).
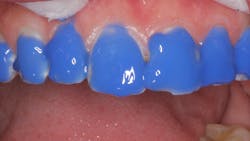
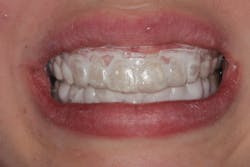
Remin Pro was then applied to the teeth with a gloved finger, and the bleaching trays containing Remin Pro were put into place (figure 5). The patient was instructed to wear the trays daily for at least 30 minutes, with longer being better. The goal of using the chemotherapeutic cream was to remineralize the white spots in a minimally invasive way now that the enamel pores were wide-open.
The patient was seen weekly in the office. For these appointments, the white spots were treated only with the 37% phosphoric acid followed by Remin Pro.
In time, the teeth began to remineralize, and the enamel started to look more normal. Given our limited time frame, at five weeks we included a home whitening regimen (Opalescence, Ultradent Products). The patient was still seen weekly for application of phosphoric acid and Remin Pro until her wedding day.
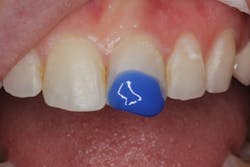
During week seven, we fixed her incisal edge fracture. A mylar strip was placed to protect the adjacent tooth, and the fractured edge was etched with Vococid for 15 seconds (figure 6). Following copious rinsing and drying, Futurabond U (Voco) was applied onto the enamel for 20 seconds, air-dried, and light-cured. Grandioso (Voco) in shade A2 was placed, contoured, and polished.
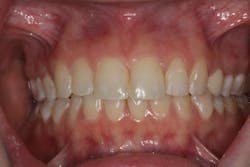
The patient was ecstatic with her new smile (figure 7). A five-year post-op photo shows stability of the result with no recurrence of the demineralized enamel (figure 8).
Additional considerations
This protocol has been repeated with great success many times in our office. However, it is important to establish proper expectations with the patient in case 100% success is not achieved. While this has not happened to me yet, I expect at some point it may. An offer to do minimally invasive composites if necessary can be communicated prior to treatment. This always makes the patient happy.
Regarding fees, the total cost of materials is small and chair time is minimal. While we charge $3,000 for these types of cases, no matter how long or short the process takes, one can charge whatever is felt to be appropriate. I always say that patients are not paying for the creams and gels; rather, they are paying for our expertise—that we didn’t “drill down their teeth.”
These procedures are frequently life-changing for people. Purely by incorporating a few products and this technique, you can achieve predictable results treating white spots in your practice too.
Having a cohesive dental team that understands the benefits of minimally invasive dentistry can be rewarding for both patients and practices. Next time a patient comes in with white spot defects, initiate the conversation about a minimally invasive approach to treatment. The results will amaze you time and time again!
RON KAMINER, DDS, is a 1990 graduate of the State University of New York at Buffalo. He is a prolific author, lecturer, and expert on dental lasers, as well as a clinical consultant/lecturer for numerous dental companies (GC America, AMD Lasers, SDI, Camsight, NuCalm, and Solutionreach). Dr. Kaminer maintains two teaching appointments and serves on the editorial board of Dental Product Shopper. He practices in Hewlett and Oceanside, New York.
About the Author

Ron Kaminer, DDS
RON KAMINER, DDS, is a 1990 graduate of the State University of New York at Buffalo. He is a prolific author, lecturer, and expert on dental lasers, as well as a clinical consultant/lecturer for numerous dental companies (GC America, AMD Lasers, SDI, Camsight, NuCalm, and Solutionreach). Dr. Kaminer maintains two teaching appointments and serves on the editorial board of Dental Product Shopper. He practices in Hewlett and Oceanside, New York.
