Little details, little errors mar and blemish X-rays
Diagnosis and less exposure to radiation remain two good reasons for brushing up on skills for taking radiographs. Some of the more common errors are reviewed in this article.
Jacqueline N. Brian, RDH,
Mary Danusis Cooper, RDH
Dental radiographs are an integral part of the essential information needed for the diagnosis of a patient`s condition. A thorough medical history or clinical examination may not provide enough information to determine a definitive diagnosis or treatment analysis. Radiographs, though, can provide valuable information about conditions and/or diseases not clinically evident. Radiographs can help detect anomalies, caries, calculus, abscesses, periodontal disease, and impactions.
Regardless of the need to make a radiographic examination, radiation exposure can biologically affect living tissue. One way of reducing unnecessary exposure is to avoid making radiographs that will not contribute to the patient`s oral health. However, when radiographs are necessary to assist in diagnostic decision-making, proper techniques and skills protect the operator as well as the patient.
To protect the patient, a thorough medical history or an update should be taken. This reviews the possibility of infectious or chronic diseases, as well as extensive whole-body radiation exposure. The medical history and the patient`s oral conditions will dictate the type and amount of radiographs needed. Having determined this, it is then necessary to protect every patient with a lead apron and a thyroid collar.
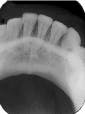
The paralleling technique for intraoral films is recommended - with the exception of an edentulous or pediatric survey. In some circumstances, such as limited anatomic and disabling conditions, the bisecting angle is the preferred technique. For example, with deciduous teeth, the overangulation is desired to view the developing permanent dentition. However, the bisecting-angle also results in distortion and, due to the potential patient and/or operator error, is not reproducible.
In contrast, the paralleling technique minimizes distortion and magnification, increasing clarity and detail. The technique decreases the number of retakes, ultimately reducing additional radiation exposure.
Regardless of the technique, every periapical needs to show the occlusal and incisal edge, as well as 2 to 3 mm beyond the apex of each tooth. This will provide the coverage necessary to determine the presence or absence of pathology.
Common errors can occur when using both the bisecting and paralleling techniques. Identifying the errors and understanding the solutions will provide quality radiographs and reduce the number of retakes.
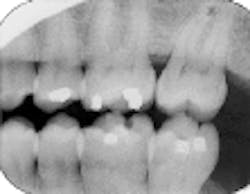
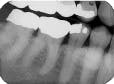
Overlap of contact surfaces
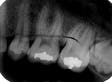
Perhaps the most common error is the overlapping of contacting surfaces (see Radiograph 1). When this occurs, the interpretation of caries is difficult at best. At worst, depending on the degree of overlap, interpretation often becomes virtually impossible.
The overlap is the result of incorrect horizontal angulation. With the paralleling technique, improper film-holder placement can be the cause. A simple adjustment in the film-holder`s position places it parallel to the facial surfaces of the teeth being exposed.
But the overlap can also be the result of errors in the angle of projection either mesiodistally or distomesially. When the horizontal plane projection is directed from mesial to distal, the resulting larger areas of overlap appear in the posterior portion of the film. Conversely, if the larger overlap appears in the anterior portion of the film, the horizontal plane of projection was directed distal to mesial.
To change this, place the film parallel to an imaginary line that is parallel to the facial surfaces of the teeth. The plane of the positioning indicating device/cone (PID) should then be parallel to this line and the film together. To determine the degree of overlap, use this general rule: If the overlap covers more than one-half of the enamel`s width, the degree of incipient decay and etchings are difficult to determine, and major technique problems need to be addressed.
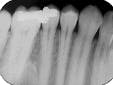
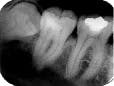
The bisecting-angle technique creates specific errors in vertical angulation, giving shortened images (see Radiograph 2 as an example of foreshortening) or lengthened images (see Radiograph 3 as an example of elongation). Substantially shortened images occur because there is too much vertical angulation. This causes distortion in the reproduction of the actual size of the tooth. The solution requires a decrease of the vertical angulation by at least 10 degrees.
Conversely, lengthened im-ages occur because there is not enough vertical angulation. Another reason is that the film is curved in the mouth. Increasing the vertical angulation by at least 10 degrees and repositioning the film to prevent bending will alleviate this distorted image.
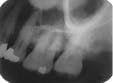
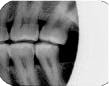
When the zygomatic process of the maxilla is superimposed on the roots of the maxillary molars (see Radiograph 4), another error occurs frequently with either technique. Too much vertical angulation will show this error in bisecting. Decreasing the vertical angulation by at least 10 degrees corrects it. With parallel technique, the key factor is improper placement of the film holder. Change the position of the film holder so the biting surface is flush with the occlusal and incisal surfaces.
Experiencing problems with bitewings?
Bitewing radiographs are particularly valuable in detecting interproximal caries (particularly on posterior teeth) before they are clinically apparent. They also help determine a more accurate height of alveolar bone. Many times in haste, though, we omit the distal of the canine bitewing exposure (see Radiograph 5). This incorrect placement of the film can be improved by adjusting the film position more anteriorly and toward the midline.
Another common error involves the occlusal plane not being centered on the bitewing film (Radiograph 6). Bitewings assist the hygienist in determining the involvement of the alveolar crest destruction. Since this is vital for periodontal evaluations, having the occlusal plane centered on the film is important.
If the occlusal plane is not centered on the bitewing radiograph, it is due to incorrect placement of the film tab or film positioning. To correct this, center the tab on the film and seat the distal portion of the film first. Then move the film toward the midline before asking the patient to close. The central ray is directed perpendicular to the film to provide open contacts, and the vertical angle is 10 degrees above the horizontal plane. The increased vertical angulation accounts for the palatal inclination and reduces distortion in this region.
Since alveolar crest destruction can be extensive, vertical-molar bitewings in the posterior areas ensure better coverage of the alveolar crest. The vertical positioning of Type 2 films increases the area of coverage by approximately one centimeter.
The vertical angulation is still a plus-10 degrees to account for the palatal inclination. Film placement, however, is slightly different with the vertical-molar bitewing. The anterior side of the film should be placed at the middle of the first mandibular molar. This will ensure inclusion of all three molars.
Cone-cutting and overlooking molars
Cutting off the crowns of anterior teeth on the film (see Radiograph 7) is another common error - regardless of whether the parallel or bisecting technique is used. The error is caused by too much vertical angulation (bisecting) or positioning the film incorrectly (paralleling).
With the bisecting-angle technique, decreasing the angulation of the PID may be all that is necessary. Make sure the teeth are covered with the film and that the film extends beyond the coronal portion.
The problem, as it surfaces with the paralleling technique, can be corrected by repositioning the film-holding device. The film needs to be parallel to the long axis of the tooth. This can be achieved by moving the film away from the crowns of the teeth. Move it towards the posterior portion of the mouth while still keeping the film as parallel as possible to the long axis of the tooth.
The apices of unerupted or erupted third molars clearly are essential to have captured on the film. Many anomalies may be projected around the surrounding root area. The absence or presence of pathologies will be necessary to determine proper treatment for the patient. The radiograph can show the curvature and development of the root, as well as its positioning. This information helps determine the type of extraction and the degree of difficulty associated with the treatment.
On the maxillary third-molar film (see Radiograph 8), absence of the apices with the paralleling technique may be caused by improper film placement and inadequate vertical angulation. Correct the problem by placing the film at an oblique angle to the distal and, if necessary, increasing the vertical angulation to intentionally foreshorten the root.
When bisecting, apices may not be visible on the film due to inadequate vertical angulation. Again, increasing the vertical angulation, as with the paralleling technique, will help correct this problem.
For the mandibular third molars (see Radiograph 9), improper film placement and vertical angulation may again be the reasons for not successfully obtaining the apices of unerupted or erupted third molars. If using the paralleling technique, place the film at an oblique angle to the distal and increase the vertical angulation, if necessary. Increasing the vertical angulation during the bisecting technique will again intentionally foreshorten the apices of the tooth.
Cone-cutting is another quite frequent error (see Radiograph 10). Since it is important to view the teeth and surrounding structures for possible pathologies and diseases, cone-cutting must be avoided. The cause usually is not having the total surface of the film covered by the PID, and the error is apparent with both the bisecting-angle or paralleling techniques. With bisecting, redirect the PID to cover the surface of the film. Since the mesial portion of the film is easiest to view when aligning the radiograph, make sure it is covered. This ensures that the posterior portion of the radiograph will then be covered.
Similar problems occurring while using the paralleling technique can also be corrected by checking the proper PID alignment.
Proper techniques always lead to good X-rays
In addition to the common errors discussed above, other factors should be considered for the paralleling or bisecting-angle techniques. Since bitewings are valued for producing the maximum anatomic accuracy, for example, a parallel relationship is critical. This can be accomplished by positioning the patient with the ala-tragus line (maxillary arch plane) parallel to the floor and the sagittal plane perpendicular to the floor.
Placement of film holders intraorally also directly affect the quality of the radiographs. The film should not be bent since the resulting black lines cause distortion. The distortion, of course, can eliminate the areas of concern for the diagnosis (see Radiograph 11). Instead, reposition the film by using a two-point contact before patient closure. Before the patient is asked to close, the film should touch the palate or the floor of the mouth, and the film holder should be on the occlusal surfaces. If the film is seated first, then closing will hold the film in place.
Placement of identification dot
The identification dot is another consideration in film placement of periapicals. The dot should always be placed toward the incisal or occlusal area. The exception is for the mandibular right-molar area where the dot should be placed down or toward the apices. This placement allows for undisturbed reproduction of the retromolar area. All other apical areas have been established in a full-mouth radiographic series.
When using plastic film holders, the cusps may slide on the biting surfaces. To avoid this, use cotton rolls attached with orthodontic elastics to hold the rolls in place.
Even after focusing on correct placement of the film holder, it may still be difficult to get the apices on the radiograph. When this happens, add 15 degrees to the vertical angulation. Even this amount of additional angulation will not result in appreciable distortion.
Keeping Options Open
When dealing with confining conditions or limitations in the oral cavity, it is essential to have options available when the traditional approaches do not work.
- A narrow arch requires the film to be placed more towards the posterior of the mouth.
- A short lingual frenum and mandibular tori necessitate that the film be placed on the tongue with an increased vertical angle between -40 degrees to -60 degrees.
- With a shallow palate, the bisecting-angle technique is an alternative approach.
The latter technique is also best for edentulous surveys. It is much easier to have the patient hold the film. Vertical angulation is determined by bisecting-the-angle created by the film and the alveolar crest of bone. The horizontal angulation is derived by placing the plane of the end of the cone parallel to the surface of the film.
Summary
As with any profession that deals with ionizing radiation, the safest approach is to achieve perfection with each technique and radiograph. Operator error should not be the reason for additional radiation exposure.
Keep the needs of the patient in mind and work rapidly. But do it without undue haste. Identifying technique errors quickly will decrease patient and operator time.
Each office should have an established quality-assurance program that monitors operator errors. Perfecting technique is vital to producing quality images and diagnostically useful radiographs.
The ultimate goal is to develop operator integrity and competence so patients can be educated and motivated to develop good oral health care.
Jacqueline N. Brian, RDH, MS, and Mary Danusis Cooper, RDH, MS, are associate professors of dental hygiene at Indiana University-Purdue University in Fort Wayne, Indiana.

Radiograph 1
Radiograph 2
Radiograph 3
Radiograph 4

Radiograph 5
Radiograph 6
Radiograph 7

Radiograph 8
Radiograph 9
Radiograph 10
Radiograph 11