Cone-beam computed tomography in pediatrics
Colleen Roy, BSDH, RDH
When I first saw the online post asking for pediatric articles to publish in this issue of RDH magazine, I stopped to read what topics they were searching for. Listed among the topics was pediatric x-rays. Initially I thought, “Who wants to read another article about bitewings?” Working in a practice that specializes in both pediatrics and orthodontics, I’m lucky enough to work with cone-beam scanners and I regularly take CBCTs on our patients.
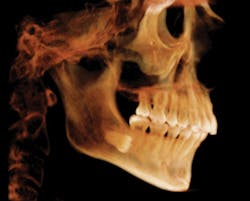
These are typical 3-D images created with a CBCT scan. These images can be moved in any direction needed for a better view of what patients need to see. It is also possible to remove layers along the axial, coronal, and sagittal planes to enhance views.
What is cone-beam computed tomography?
Cone-beam computed tomography, commonly referred to as CBCT, is 3-D imaging using cone-beam scanners that produce -layers of images to help diagnose patients. The 3-D images provide information that helps with more accurate diagnosis and treatment planning, and it eliminates the guesswork of traditional 2-D images.
I remember being both impressed and overwhelmed the first time I saw a CBCT image. It made me want to run and dust off my head and neck anatomy book to brush up on all the anatomical landmarks. I’m fortunate enough to work with an orthodontist who embraced CBCT technology early. His passion for the information it provides and how the findings impact patient treatment planning is infectious. Watching as he quickly scans through the layers of images to point out anomalies and benign pathology inspires me to want to do the same.
However, when your office first starts using CBCT, your doctor will probably want to send scans to a radiologist to confirm any findings and to be sure nothing is overlooked. There is a considerable amount of information contained in each CBCT scan. Once staff members become familiar with the software and have read numerous radiologist reports, the doctor will become comfortable with common findings on CBCT scans. Common pathologies include inflamed sinuses, condylar position and morphology abnormalities, restricted airways, and benign cysts.
Another example of a 3-D image revealing impacted canines. This image had some of the posterior portion of the image removed to bring focus to the anterior.
How have CBCTs impacted hygienists?
The first day our cone beam arrived, I had mixed emotions. My initial thought was, “How am I ever going to learn all these steps?” In our office, a typical hygiene appointment is 30 minutes. Occasionally we find out at the end of an appointment that the doctor wants to prescribe a panoramic image (for that day). Previously, our traditional way of taking panoramic images was a five-minute process of “click and save” before sending the patient on his or her way. Our beloved 2-D panoramic machine was replaced with this new cone-beam scanner and we had to figure out how to use it. After our demonstrations and trainings, I methodically wrote down the steps so my coworkers and I would have a cheat sheet. But, like anything, it took time and practice to become proficient at using the new technology. Mastering our new cone-beam scanner became an exciting new challenge that I was eager to conquer.
We experienced a lot of frustration during the first few weeks as we struggled to embrace the ins and outs of this new machine and its software. As you can imagine, learning new equipment and staying on time with patients don’t always go hand in hand. Slowly the fear I felt when I heard, “Can you take a CBCT?” faded and was replaced with excitement. It’s a thrill to know that with each scan I’m about to uncover something amazing to share with patients and their parents.
This is an example of what a typical panoramic image created using a CBCT scan looks like.
Showing parents that their child has impacted canines on a 2-D panoramic image isn’t always clear and obvious. However, a 3-D image can be spun around from front to back and left to right to clearly show patients and their parents the impacted canine. The software even enables us to peel back layers that may be obstructing the view, which allows for the most accurate diagnosis. When parents are able to see and understand these factors, they usually can’t wait to schedule their child’s orthodontic treatment.
How much radiation is there versus traditional 2-D panoramic images?
The first question many people ask is, “How much radiation do these images create?” Your cone beam will have settings that allow you to control how many microsieverts it will emit. Our office uses an ultra-low-dose setting. When using the ultra-low-dose setting, a whole scan will emit less radiation than one periapical image! Considering the amount of information you can receive from one scan, it’s an incredible comparison to make. However, periodontal practices may use a higher setting due to the precision required for placing an implant. The higher the setting, the more detailed the images will be.
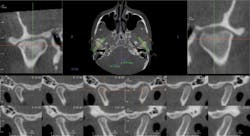
Here are multiple cross sections of both the left and right condyles revealing both active and nonactive condylar degenerative joint disease.
The benefits of 3-D images compared to 2-D images are numerous—they provide an enormous amount of information that helps with more accurate diagnosis and treatment planning, they eliminate the guesswork from traditional images, and they give a higher diagnostic yield with a lower effective radiation dose than traditional 2-D panoramic images.
An introduction to the software
Some of the software programs that we use in our office are Dolphin Imaging and Treatment Studio. I wanted to learn as much as I could in the least amount of time, so I found an excellent tutorial for Treatment Studio on YouTube. To be honest, I had to watch it more than once because I think I dozed off the first time. I have to admit, it’s more fun learning software hands-on than watching a video. Dolphin Imaging provides several tutorials on their website. I spent many nights watching the videos, which helped me gain the confidence I needed to work with the CBCT images after taking a scan.
This is a sagittal cross section with a completed airway analysis of the nasopharyngeal and oropharyngeal airway.
The many features of the software programs include the ability to take screenshots of TMD issues, view the sinus, and analyze a patient’s airway volume. They also eliminate the need for a separate cephalometric image in orthodontic cases. Lastly, the software can generate a panoramic radiograph quickly and easily, albeit with a bit of practice.
Overall, working with cone-beam images in a pediatric setting has been exciting and enjoyable. I have yet to fully master all the possible uses of the CBCT software, but I do feel confident using the technology. Seeing is believing with most things in life, and with a CBCT scanner you’re able to see it all.
Colleen Roy, BSDH, RDH, fell in love with dentistry more than a decade ago while working in a general practice for several years before applying to hygiene school. She attended Forsyth at the Massachusetts College of Pharmacy. After graduating, she worked at several offices before finding her home at a combination pediatric-orthodontic office. She finds working with children to be very fulfilling, because each day is filled with new challenges and discoveries.


