4 tips for working around a permanent retainer
When I went through my own clear aligner therapy a few years ago, I was very excited to finish the treatment and have that perfectly straight smile without buttons cemented on my teeth or trays that I had to tote around everywhere. As they were doing the final scan of my teeth, the orthodontist looked at me and said, “Now we’ll place permanent retainers so your teeth will stay this way forever.”
As a dental hygienist, I unfortunately know too much about these retainers. I’m sure you feel the same way. We’ve seen all the designs, shapes, and different levels of cement that are needed to keep them in place. Of course, I told my doctor that I was going to pass on having permanent retainers placed and stick to nighttime removable retainers.
Fast forward a few years later, and my teeth have definitely shifted. Do I regret my permanent retainer refusal, even with shifting teeth? I do not. They are tricky to work around, catch bacteria due to their uneven surface, and are hard to keep clean at home, even for a dental hygienist.
As you work around these retainers in practice, allow me to share a few helpful tips you can try to be the most effective in scaling and visually seeing around the bar
4 tips to work around a permanent retainer
- Use lots of air! A little puff usually isn’t enough with a permanent retainer. You will usually need to spend a few seconds on each tooth to be able to thoroughly see what’s calculus, what’s cement, or if everything is great to move on. Side note—not all patients can tolerate that much cold air on their teeth. Always ask your patient beforehand if they’re sensitive to air.
- Use your smallest tip instrument. With the little nooks and crannies around permanent retainers, you’ll want something with the tip. The Nebraska instrument is perfect for this, or a Nevi/Blackjack/Montana Jack can sometimes be manipulated to get in these tight areas.
- Make sure your instrument is sharp. With such tight spaces, having a sharp instrument is key for calculated strokes and to prevent slipping off the tooth.
- Use your mirror from all angles. It’s easy to use your mirror and look straight at the lingual of sextant 5. But if you move your mirror to the sides, you’ll be able to see around the line angles, bar, or composite, allowing better visuals on where you need to instrument.
We know that these retainers are not going away, so feeling comfortable working around them is key as you get into private practice. With time and patience, you’ll definitely get there.
And remember that we have all pulled one off while scaling. If one ends up coming off during treatment, it’s usually weak and going to come off on its own. Plus, it’s better that it comes off in the office than while the patient is eating on a weekend or on a vacation. If one comes off in your dental chair, you’re in good company with many other dental hygienists.
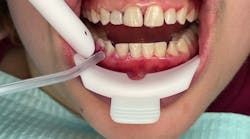
Watch our Hygiene Edge video above for more clarification.

About the Author

Melia Lewis, MEd, RDH
Melia Lewis, MEd, RDH, is a dedicated clinical dental hygiene professional with a passion for advancing oral health education and patient care. Currently, she practices at Aspen Heights Dental in Highland, Utah, and is an adjunct professor at Colorado Northwestern Community College. She is cofounder of Hygiene Edge, an online education platform full of helpful tips and tricks to make dental professionals’ lives a little bit easier, and owns and operates Acuti Sharpening, a dental hygiene instrument sharpening company.
Beyond her work as a dental hygienist and educator, Melia is committed to advancing the profession. Her innovative approach and dedication have earned her recognition as a leader in the field of dental hygiene. Reach out to her at [email protected] or on Instagram @hygieneedge and @meliardh.