Using a self-adhesive sterilization pouch
by Noel Kelsch, RDHAP
[email protected]
I went to an office today and witnessed someone tripping really hard. It was not her feet that she was tripping over; it was infection control.
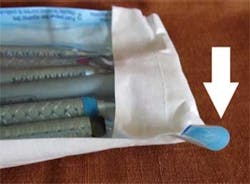
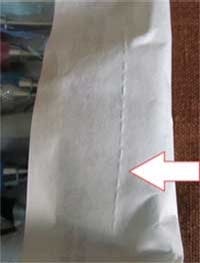
Do not fold over to fit item, or fold on crease or perforation.
Infection control is a series of steps that we must perform to ensure the safety of our staff and clients. When we do not follow those steps precisely, we might as well not follow those steps at all. The step being tripped on was a simple self-adhesive sterilization bag. Sterilization pouches are approved by the Food and Drug Administration and are a medical device. The 2008 Center for Disease Control and Prevention guidelines reminded us that these devices "must allow penetration of the sterilant, provide protection against contact contamination during handling, provide an effective barrier to microbial penetration, and maintain the sterility of the processed item after sterilization."
Improper gap.
The method of using them involves a series of steps, starting with the sterilization room:
- Step one: Fold the perforation back and crease with the protective strip still in place. Fold back into place.
- Step two: Write the date and time, or load number, on the outside of the pouch, with a lead–free pencil or nontoxic indelible ink pen.1 This will allow you to pull the load easily if you receive a failed load report. Record the load type, date, and number in your sterilization notebook.2
- Step three: While wearing utility gloves and personal protective equipment, load the dried, debris-free instruments (that have been run through the sonic cleaner) into the pouch. Be sure not to overfill the bag. It should be filled only to 3/4 of its volume. Make sure the instruments do not pierce the package. Choose the right size bag for the item. Do not over fill or fold for smaller items. The pouch is correctly sealed when the closure strip adheres without any folds or gaps.
- Step four: Expel excess air from the package.
- Step five: Remove the strip from the adhesive, fold at perforated line to form a tight seal. Press the adhesive together by running the edge of spatula or flat item across the area. Allow the adhesive to adhere to 50% to be on paper and 50% to be on plastic, or follow the validation marks on the pouch. Do not fold the adhesive past the perforation. Adhesive not touching the right amount of paper and plastic will not create an airtight seal.
An adequate width of adhesive material with a clean perforated fold allows for a clean, uniform fold and seal, which assures safe storage of the sterilized item and does not allow air and pathogens to enter the item.
Companies now make validation marks on the package to ensure you are closing it properly. Make sure you have the perforation line folded and lined up before removing the adhesive strip.
- Step six: Store filled packages on the dirty side of the sterilization area until ready to process.
Chairside:
Do not put your gloves on until you have opened the pouch. Contaminates from the outside of the package can contaminate your gloves. When you touch the instruments with the gloves, you can cross-contaminate.
Do not put the outside of the package on top of the instruments or on the tray. The outside of the package has been exposed to contaminate and is not sterile.
As you open the pouch, allow the instruments to "drop" onto the tray so that they are not contaminated by the outside of the package.
Each of us has a responsibility to keep our patients and staff safe. Using the FDA-approved device properly step by step allows all of us to avoid "tripping" and putting everyone at risk.
References
- Association for the Advancement of Medical Instrumentation. ANSI/AAMI ST79:2006 Comprehensive guide to steam sterilization and sterility assurance in health care facilities. 2006. Arlington, VA: AAMI.
- Palenik CJ, Burke FJT, Coulter WA, Cheung SW. Cross–Infection Control, Improving and Monitoring Autoclave Performance in Dental Practice. Brit Dent J. 1990;187:581–84
Noel Brandon Kelsch, RDHAP, is a syndicated columnist, writer, speaker, and cartoonist. She serves on the editorial review committee for the Organization for Safety, Asepsis and Prevention newsletter and has received many national awards. Kelsch owns her dental hygiene practice that focuses on access to care for all and helps facilitate the Simi Valley Free Dental Clinic. She has devoted much of her 35 years in dentistry to educating people about the devastating effects of methamphetamines and drug use. She is a past president of the California Dental Hygienists’ Association.
Tips to remember:
- Store unused pouches in a cool, dry place before use. Heat and moisture can compromise the indicator, adhesion, and materials.
- To check if your pouch is able to achieve a proper seal and that you are doing the process correctly, simply do a water test. Seal the pouch with nothing inside. Open the opposite end of the seal and add water halfway up. If it is leaking, it has not been sealed properly or the seal material is inadequate.
- Many companies have instructions and videos to help you learn how to use their pouches.
- It is important that pouches do not come into contact with the chamber wall. Do not overload the chamber. The most effective way to load the sterilizer is to follow the manufacturer’s diagram for loading. Most units are loaded vertically, allowing the most access to the sterilant. If the unit requires you to load horizontally, make sure the pouches do not touch one another so that there is a maximum amount of exposure.
- Training must occur for every staff member using this device. Any staff that is involved in sterilization must be trained and retrained if a new product is put into use or the old product has a new feature.
- Do not remove sterilization pouches from the sterilization device until it has been fully processed and is dry. Wet items can wick pathogens back into the package.
- Shelf life for sterilized pouches is now considered event related. If the sterilization pouch is stored in a drawer that is allowing the pouch to move around and pierce the side, it will have to be reprocessed using a fresh bag. Life of the bag depends on the handling, movement, and environment. Check each bag for compromise before use.
- The plastic must be completely separate from the paper when tearing the pouch open. The outside of the plastic has been exposed to the environment and pathogens may be present on the outside of the package. If the plastic is adhered to the paper, there is a chance of cross–contamination if the instruments touch the plastic. Test your pouches before using by simply tearing the plastic from the paper. If the plastic adheres, return the supply to the manufacturer.


